Showing posts with label growing. Show all posts

Saturday, 18 January 2014

Making pasta sauce


The tomatoes in the Hugelkultur bed have been supplying us with yummy Roma tomatoes for some time now and we have added them to most lunches and dinners (and the occasional breakfast), we are all at the 'I don't like tomatoes any more' stage, reached at some point in every harvest season when there is a glut. Therefore, I decided (this morning) to make some pasta sauce and bottle it using my trusty but under utilized Fowlers Vacola (FV) unit. That way we can have our tomatoes to eat in the winter when we are all craving them. I decided to use glass jars with metal lids (the ones you buy pasta sauce in in the supermarket) instead of the traditional FV jars because the FV jars I own are all huge (1 litre is the smallest) and we use our pasta sauce in small lots so the smaller jars are more practical for us.

A bucket of Roma tomatoes from the garden

Stage one of the Hugelkultur beds cleared and waiting for a compost top up and mulch before replanting.

I found a fairly easy recipe for tomato pasta sauce that can be preserved using the water bath method. The recipe below has been copied from the Brisbane Local Food site and changed only slightly. The link in the title will take you to the original post.


Home made pasta sauce
Makes 1.5 cups

You need a large non stick frying pan or a wok and a stick blender

1/3 cup of extra virgin olive oil
1 onion, finely chopped
1 fresh bay leaf
500g ripe tomatoes, roughly chopped
2 cloves of garlic, finely chopped
8 sprigs of basil, oregano or mint
sea salt, ground black pepper. About 2/3 tsp of salt per 1 1/2 cups of sauce is recommended.

Heat oil to medium heat, add onion and bay leaf, cover and cook for 5 minutes or until onion is softened but hardly coloured. Add tomatoes, garlic and herbs. Cover, cook on medium heat, stirring frequently until tomatoes have collapsed. Add seasonings and blend until the sauce is a pleasing consistency and you are ready to bottle.

Preserving
Put sauce into clean, sterilised jars with good lids that will vacuum seal. If the pulp is still really hot, put a sterilised spoon in the jar before filling to prevent cracking. Place jars in a water bath up to their necks and bring the temperature up to 93.3 degrees Celsius (or 200 degrees Fahrenheit).
Hold at this temperature for two hours. Remove from the preserving pan and press down the lids to encourage vacuum sealing.

N.B. The Fowlers Vacola manual states that unless you use all their gear they won't be held responsible for these instructions being no good.

The chopping begins

But not before they get a good wash

Pasta bottles; found, de-labeled and washed by my eldest daughter (thanks hon)

The sauce; boiled, seasoned and blended, ready to bottle.

My good old FV stove top unit. Isn't she a beauty?

The bottles in their bath, all carefully positioned so they don't touch each other or the sides. Fowlers Vacola frowns on touching in the bath.

The final result; six yummy bottles of pasta sauce. I had better label them before I forget what they are though.

I want to do more preserving, it's so much fun.


Friday, 6 December 2013

Square foot garden update


The seedlings are up in the trailer bed in which I am trialing square foot gardening. The beans are towering above everything else but most of the seeds have sprouted.

I have taken the advice of Mel Bartholomew and thinned the seedlings to the appropriate number and spacing per square foot, it caused me great pain to pull out good seedlings and volunteer plants from the last crop so I hope it pays off.

The bush beans are growing so fast they will be taller than the strawberries by tomorrow.

You can just see the carrots coming up.

The lettuce is looking healthy inside it's square.


The Tokyo Bekana is up, and it needed thinning.


 I am watering the entire bed at a rate of 10 litres per day, I scoop out the water from our showers and use it to water the whole garden. When the seedlings have all grown a set of true leaves I will mulch between them with a fine mulch like dried grass clippings or chaff to help retain moisture in the soil.

I am now wondering if I could combine square foot gardening with my Hugelkultur beds to make use of the best qualities of both methods, or would it be better to  use the Hugelkultur beds for large vegetables like zucchini, brassicas, corn and tomatoes and use the square foot gardening bed for small vegetables that can be grown intensively. What do you think?

Sunday, 24 November 2013

Square foot gardening


The trailer bed has been planted with broad beans, snow peas, lettuce, beetroot, strawberries and calendula as my late winter/early spring crops. Now all those crops are finished so it's time to replant. 


The broad beans produced very well.

The calendula provided flower petals for oinitment, seeds for planting and looked pretty too.

The lettuce and strawberries grew really well together but now the lettuce has gone to seed.


Square Foot Gardening
I have been reading about square foot gardening lately and I thought I would give it a go in the trailer bed because the size of the trailer can be divided into 24 neat square foot beds.

I used wool to mark the beds out; not a long term solution, but it will do for the first planting.
I later removed the calendula, but decided to leave the strawberries.
The idea is to plant a given number of plants in a square foot of garden space. The beds need to be easily accessible and it's an advantage to have some trellis space. It's amazing how many varieties of plants can be squeezed into that little trailer bed using this method.
This method of gardening was pioneered by Mel Bartholomew, who must have a good mathematical mind.

This chart gives a planting guide for lots of common vegetables.

I planned the planting of my trailer bed using an online planning tool which made the planting much easier. Then I got to work planting the bed.


My November planting plan for the trailer bed (for some reason it shows the planting date as the date I downloaded the plan; the real planting date is 17th November 2013).

I dug up each square, added compost and a sprinkle of blood and bone and planted the required number of seeds in the square in the advised pattern.

The whole bed looks neat and tidy again. I put the shad sheet back on until all those seeds sprout then I will mulch the bed and take off the shade.


Carrot and Potato towers; growing potatoes in small spaces.

 You guessed it.....as I am largely immobile due to my knee injury I decided to go through my photos for the last few weeks and update all the posts I planned but didn't get to.

Carrot towers
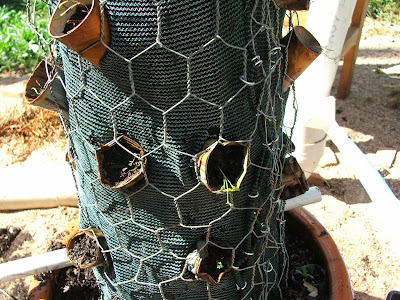
The carrot towers have been disappointing so far; the carrots haven't grown at all and many have died. I'm not willing to give up on the idea yet though. Some of the possible causes of the failure are;

  • Transplanting the carrots (they don't really like to be moved) or transplanting them too young.
  • Over watering (I admit I went overboard on the watering because they were right beside the door)
  • No morning sun.
So next time I will either plant advanced seedlings, or seed into the tubes and I will move the whole thing to a spot that gets morning sun.


The carrots have not grown at all.

The marigolds around the bottom look great though.

Potato towers
I have had some success with potato towers though. The basic theory is the same as the carrot towers except all the growth comes out of the top of the tower and the height allows the plant to form many more potatoes than it could in the ground.

The potatoes surrounded by compost which is kept inside the wire tube by a newspaper lining.

The potatoes are planted into cardboard boxes full of compost to reduce grass invasion.
Each tower is planted with two potatoes, I have Desiree and Kipfler  potatoes in this year.

Friday, 27 September 2013

Carrot towers; an experiment in intensive growing


My little Purple Dragon carrot seedlings are growing up so fast so I thought it was time to start experimenting with ways to grow them.

We have no topsoil here at all (well a few centimeters in some places) so I have been thinking about raised beds for carrots for a while, then I came across this idea, called a flower tower and thought "Why not try it with carrots?"

As you can see, I built the frame as per instructions (see the 'flower tower' link)

Then I found a stray piece of PVC pipe and thought it would make a good water delivery system.

So out came my trusty drill

Dozens of holes were randomly drilled all over. I also plugged one end with a sink plug.

The pipe went into the middle of my frame, plugged end down.

Then I filled the lot with potting mix and compost.


I also added some PVC pipes through the bottom, sticking out about 25cm, to provide supports for the cover.

The seedlings were poked through the shade cloth into the potting mix. A job which took ages.

I planted a tomato and a love-in-a-mist in the top to provide colour and shade to the carrots (and maybe even tomatoes)

And marigolds around the base, for companion planting and for more colour.

The wire cover went over the whole lot and the seedlings watered in

Then I added an old sheet over the cover because it's a windy, hot day and the little seedlings need all the cover they can get for a few days.


The result so far is a mysterious, sheet covered mound. I have some concerns about this method;
If the carrots grow straight down, will I be able to harvest them?
Will I be able to keep the water up to them?
It is a time consuming business, putting the carrots through the shade cloth, is the yield worth the time?

I only planted 10 carrots in the tower as a trial run, but if it works there is room for 50 in just this little tower so the method certainly is space saving.

I will keep you posted on the progress of this experiment.

Friday, 13 September 2013

Seedling area update

It has been a few weeks since I received my Diggers Club order and set up the little seedling house..so time for an update. The Diggers Club seeds have proven very fertile with most seeds germinating within days of being sown. I have developed a Standard Operating Procedure (SOP) for my planting and potting on (I just love the official sound of that; really it's just the way I do things for now).

I sow the seeds in punnets of potting mix, label them and put the date on them.


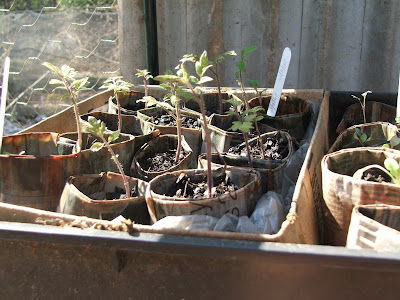
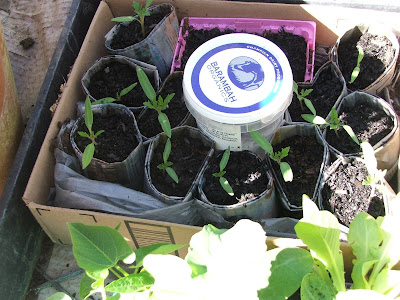
When the seeds have germinated and are big enough to handle, I pot them on individually into newspaper pots filled with compost (to give them a burst of nutrients when they need it).

How to make paper pots (although I use several layers of paper to make them last longer)


Once the seedlings have recovered from potting on, I move them to the second plant stand in the vegetable garden area to grow up enough to plant (or to wait until bed space is available).


So far this SOP is working really well and I have been able to produce lots of tomato (Black Russian), carrot (Purple Dragon), rocket (Pronto), broccoli (Purple Sprouting) and Love-in-a-mist (Blue). The beetroot (Heirloom mix) has sprouted in it's punnet, but I haven't had time to pot them on yet.
 A weekly water with fish emulsion mix cures the leaching of nitrogen from the compost by the newspaper pots that was happening to begin with.

I water the seeds in punnets with pure water every three days or so and the seedlings with the water from the chook's drinking container when I wash it out (about every two days). The vegetables in the beds are surviving on the water from the sheep trough when I change it (about every three days) and the washing and rinse water from clothes washing (once a week). This system means that I use every drop of water twice (the shower water drains to the bog garden site, which will be planted with comfrey, banana, Louisiana iris and sweet potato, but isn't yet) and I can survive for much longer on our single tank of rain water.


In other news....
I have a hen sitting on some Minorca eggs, thanks to the kindness of one of my friends (thanks Zoe) who gave me a dozen fertile eggs. I thought it was time to introduce some new blood into my flock, and fertile eggs are the best way to do it. When chickens are raised in the flock from the egg up they do not introduce new diseases and the trauma (to the chickens) of introducing new flock members is eliminated.


Tuesday, 20 August 2013

The seeds are here!

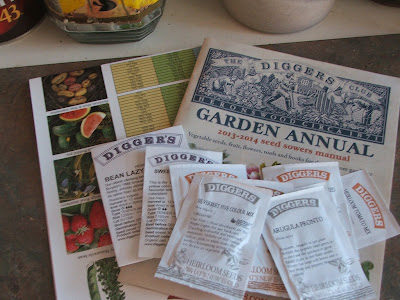
My package from the Diggers Club arrived. I got open pollinating seeds of;

  1.  rocket - pronto
  2. Beetroot - Chioggia, Bull's Blood , Golden and White Blankoma
  3. Broccoli - Purple Sprouting
  4. Eggplant - Rosa Bianca, Violetta di Firenze, Slim Jim and Listada di Gandia
  5. Green beans - Lazy Housewife (I wish)
  6. Carror - Purple Dragon
  7. Tomato - Tommy Toe
  8. Corn - Golden Bantam
  9. Water melon - Moon and Stars
  10. Silverbeet - Five colour mix


My new seed collection

I decided to take my daughter's advice and put the seedlings beside the back door. I didn't have to move the sick animal aviary after all because I bought one of the little plastic covered green houses suggested by Jacqui (Dusty Country Road blog) and put it in the most protected position I could find, as also suggested by Jacqui. The little green house is now full to the brim with seeds planted in punnets and newspaper pots.
The new seedling raising area. My potting table is to the left against the aviary wall and the little green house is full of enthusiasm.
Some of the seedlings in my little green house. Roma tomatoes potted on from a punnet I bought. These are bound for the school gardens I am custodian to.
In an excess of enthusiasm I also potted some herbs into an indoor herb tower which will live beside a North facing window in the kitchen and hopefully result in us having lots of parsley, chives, oregano and mint added to our meals (not all of them together, obviously).


The next challenge for me is to complete stages 3 and four of the Hugelkultur beds so I can plant out all these new seedlings. I have given myself a month to do that. Wish me luck.

I am finding that setting myself goals that have to be met by a certain time is helping me to get things done in the garden. What techniques do you use to get things done?

Thursday, 8 August 2013

Heirloom seeds on the way

I just joined the The Digger's Club and ordered my first batch of heirloom, non-hybrid, non-GMO vegetable seeds. It's very exciting for me and I am dreaming about the vegetable garden I will grow with these seeds.

Now all I have to do is build myself a seedling raising area that is rodent and chook proof, has enough light and is not in danger of getting too hot as the weather warms up and is close enough to both the humpy and the vegetable garden to be convenient for daily visits; all in the next two weeks (which is the deadline for the arrival of the seeds.

There are several candidates for a position;
Beside the front door
Advantages; I pass it all the time, it is fairly sheltered from the wind.
Disadvantages; it faces west and so gets only afternoon sun.

Behind the tap on the left of the door is a 40 cm  x 85 cm space.


Beside the back door;
Advantages; it faces east and so gets morning sun, it is sheltered from the wind and hot afternoon sun and I pass it often.
Disadvantages; I would need to move the 'sick animal' aviary to a new position (it is currently housing an out of season clutch of chickens.

The aviary on the left is where I keep sick wildlife and other animals that happen to stray into my care (the fish tanks are for snakes and lizards)

Beside the chook pen/vegetable garden gate;
Advantages; It is close to the vegetable beds, I pass it all the time, it has morning sunlight to some extent.
Disadvantages; It requires cleaning up an unruly mess (could be an advantage also), it faces west and is exposed to the east also, it is exposed to the wind.

It looks even more of a mess in photos. I think I'd better clean this up no matter where I put the seedlings.


I would like to hear some opinions about where I should put my new seedling area and some suggestions for making it rodent and chook proof. Feel free to comment.