Showing posts with label building. Show all posts

Thursday, 28 September 2017

Earthbag building experiment- the new bathroom- starting on the walls

School holidays are here again, so it's time to attack some of those projects that go on hold while I try to master (or better yet...mistress) the delicate art of teaching. I have managed to become very busy this holidays; taking loads of junk to the dump and working on projects at school, so have not had any time to work on my earthbag walls. This morning I managed to finish half a round (with the reluctant help of my daughter) in an hour.

My mostly mythical partner was home for a day last weekend and knocked together some 'velcro plates' or cleats, which hold little pieces of wood in the walls to facilitate attachment of door and window frames (or shelves later on). Velcro plates are made by attaching a piece of wood (3 x 1 1/2 inch is good) to a piece of sturdy ply wood about 30 x 30 cm in size and putting nails through the ply plate in both directions. When these are embedded in the wall between earth bags they provide a solid piece of wood in the wall to which frames and stuff can be screwed at a later date.

A velcro plate. You can't see it but there are nails going down into the bag below too.


A velcro plate for the door frame between two layers of bags.

I have discovered that placing the barbed wire between the layers of bags is a two person job (after flicking myself near the eye with barbed wire) and requires a lot of weights to hold it down while bags are filled for the next layer. The actual bag filling and placing goes very quickly though, and it is not hard work at all. The heat at the moment means that we can only do a few hours of work on the project in the morning and/or afternoon, so it will not be a quick build (damn it).

The barbed wire on the first round of bags, weighed down by whatever was at hand.

A round of bags all tamped down.

While I am trying to build, life goes on around us. Two days ago one of the chooks hatched some babies. She took one look at them and decided they must be daemon spawn because there was nothing chook about them. Luckily my daughter heard them squeaking and rescued them. We are now the proud foster parents of three ducklings. I must say I am a little disappointed in the narrow-minded attitude of the hen to mixed species families.

New babies.


Saturday, 15 July 2017

Earthbag building experiment- the new bathroom- finishing the foundation

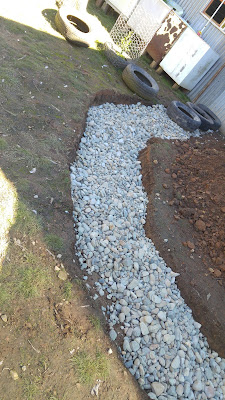
The foundations are VERY close to being finished. My partner called into Tabulam Sand and Gravel on the way home from work and loaded up another tonne of gravel (smaller pieces this time) by torch light and bought it home. I unloaded this lot into the trench, tamped it down and put the tires on top. I filled the tires one at a time with the gravel and leveled them up (they are leveled so that the walls can be built straight up, but I will have to build a few extra layers to level in the other direction).

The larger gravel in the trench.

Waiting for the next load of gravel.

A trailer full of smaller gravel.

A badly exposed photo of the trench...I just thought it looked pretty.

Starting to fill the tires with small gravel.

The tires are leveled in one direction, so the walls won't tilt.


Of course we are three wheelbarrows short of finishing the foundation. That's just the way it works.

The doggy building inspectors appear to approve.
We went to Bunnings and got a door and frame, some materials for making 'velcro plates' to attach doors and windows to (more on these next post) and some plastic to cover the walls until we can render them. Now all I need to do is find the last three wheelbarrows required for the foundation.

Next time....on to the walls.

Sunday, 9 July 2017

Earthbag building experiment- the new bathroom- foundations


School holidays are here. Sixteen days of restful bliss...excepting the planning of teaching for next term (probably three days), a working bee or two to finish projects at school (two days should do it), visits to various schools to water and maintain my garden (four half days, so two days altogether) and visiting friends and family (two days). In the seven days of restful bliss left after that lot I have decided to build myself a bathroom. I'm not planning on killing myself though...there is a plan  in place. I have recently taken to wearing a fitbit (one of those wrist band things that tells you how many steps you've taken today, how many sets of stairs you climbed and how many times you got your heart rate up, for whatever reason), and the recommended number of steps per day is 10,000. So I plan to build each day (that I have to myself) until my fitbit announces that I have done 10,000 steps (which it does by buzzing in a satisfied way while showing star bursts on the screen), then I will relax and do some everyday house work stuff until the next day. That way I can be sure I'm doing the recommended number of steps per day and get a good amount of work done on the bathroom as well.

Since the brown snake incident (about 18 months ago), we have been showering outside with a bucket of warm water and a jug. Two winters of outside showering is enough for me, I want a bathroom.

Our outdoor showering area.
 After much discussion and research I decided to have a go at earthbag building. This method involves filling polypropylene feed bags with soil and stacking them into walls with barbed wire between each layer. These walls are then rendered with a mix of clay soil, sand and cow manure to protect them from the sun. In the videos and books this method looks quick and fairly easy, I guess we will see.

The first step was to find a site. My barely present partner put his foot down and refused to walk up the yard in the dark to shower each night (even though we have been doing just that for 18 months now). Building the bathroom and laundry up hill from the humpy would allow me to gravity feed the water from showering and clothes washing back down to the garden beds, meaning that I don't have to cart buckets of water around the yard every wash day. Building right outside the back door means that we don't have to go outside to shower and we don't have to carry our washing baskets up the yard to the laundry for the once a week washing day. So it was decided to put the bathroom directly outside the back door, conveniently placed for access, but inconvenient for gravity fed watering of the garden.

The 'right outside the back door' area.

The foundations will be a shallow rubble trench filled with gravel and a layer of tires on top of that (also filled with gravel). I am considering a row of bags filled with gravel on top of the tires just to provide the drainage and protection from wicking moisture that earthbag buildings require (apparently).

My first, second and third days of holidays were spent digging out the trench, a not-too-arduous job considering the usual digging requirements of foundations.


As you can see, I had the doggy building inspectors around once or twice.


Now to source some gravel for the trench and tires...

On the next available day we (my partner and I) drove down to the conveniently placed Tabulam Sand and Gravel (our local cement depot) and picked up a load of river rocks for the bottom of the foundation trench.

I couldn't believe this was a tonne of rocks.

I believed it was a tonne of rocks once my partner, daughter and I wheelbarrow-ed and shoveled it into the trench.

 You may notice that my foundation trench is very shallow. At its deepest it is only 25cm deep. Most earthbag sites say that the foundation rubble trench doesn't have to be deep, so I went with that. Also I hate digging so the shallower I could get away with the better. I plan to get another load of smaller gravel to put on top of this load and to fill the tires. That should give a fairly stable base for the wall to be built on.


This is the foundation option we have chosen Its from the book 'Earthbag building' that I conveniently have in my library.

 Hopefully I can arrange another trip with the trailer to pick up some more gravel within the next day or two. I am looking forward to the next stage; filling the bags with soil and tamping them down.


Tuesday, 2 May 2017

Cleaning out the shed...oh my

It is the end of the school holidays and I have returned to work. As a teacher this time (!!!) instead of a teacher's aide. I'm terrified at the prospect, but that's another story.
As I only have a few days left of 'at home time' I decided not to waste them. I'm going to clean the shed (gasp).

Some background here; when we moved to our humpy in 2008 we had built a roof to park our caravan under which included an enclosed space in which to store all the stuff not currently in use. We moved our gear in the space of two days as we both had work to go to, so everything was just sort of dumped on the ground in the shed. It's still there.

The entrance to the shed, all choked up with stuff that just wouldn't fit into the mess any more.

Inside this mess. I know it looks like a hoarder's hideout.

Anything we needed from the shed was dug out and moved into the humpy proper over the years, but there is a LOT of stuff that I obviously haven't missed or needed in there...somewhere. Also, my long suffering (and annoying) partner has stored his tools in the front part of the shed during that time.

Now I am embarking on a whole new phase of my working life (and getting a car licence as part of that), I decided that it's time to symbolically and literally clean out the clutter. I'm not sure what is in there, but it's time to find out. Most of the contents of the shed will probably go to either the dump or (preferably) to other people's sheds. I have friends who can probably use some of it.

Day one;
We (my daughter and I) moved everything from in front of the doors and cleared the first little part of the tool section. Of course it decided to rain intermittently so we had to cover everything with tarps and the black snake (I call him Brian) was disturbed by all the deconstruction happening in his winter abode and decided to emerge from the mess, sending my daughter back to the house for a few hours.

It looks much bigger without the junk
One section all ready for organising

Day 2; We continued to dig out archeological finds from the mess; two drills that haven't been used in years, ten complete door locks still in their wrapping, my six crates of Fowlers bottles for preserving food. We put together some of the metal shelves we bought from Bunnings an age ago for just this purpose and began putting things away. The work is frustratingly slow as every box in there is falling to pieces, meaning that I have to pick up things (sometimes tiny things) from the ground and find new containers for them. I am enjoying getting rid of a lot of stuff though. The work continues.

You can see some order happening

Day 3; My daughter used old coffee jars (the big glass ones) to re-home countless bolts, screws, nails and mysterious bits of metal. Now all we need are some more shelves to put them on. I am returning to work this week so work on the shed will be a lot slower for a while, it will  get done though.

Things are starting to go back into the shed.

We put up some brackets to hang things on the wall. That pile of stuff behind my partner is all his to put away.
Day 5: We continue to work on the shed project...very slowly. We found a couple of old (very dead) fridges that we are using to house my partner's tool collection which keeps all his electrical stuff out of the dust, moisture and marauding rodents. I also found a series of old hurricane lamps that I had been keeping 'just in case'. I decided to put them in the humpy as decoration, and as a backup for lighting (they are still fully functional).

All lined up

I just love old stuff

I was hoping to delay this post until the shed was a shining example of organisation and cleanliness, but it now seems that that vision is a fair way in the future so this will become a two part post. It may not seem to be any neater from my photos, but I assure you it is much better. I look forward to the day when the shed is done.

Wednesday, 21 September 2016

Making papercrete - Yet another way to use rubbish

Over this winter I have noticed a breeze blowing through the gap in our lounge room floor; the difference in height between the tyre floor and the pavers. This sneaky little breeze makes my feet cold while I spin (and I'm obviously metamorphosing into a cranky old lady) so I decided to try to block off this gap.
Enter the idea of papercrete; I have newspaper in abundance so it seemed a natural progression to mix up some papercrete and plug the gap with it. Papercrete is made by mixing newspaper soaked in water with concrete. The similarity between the recommended procedure and what I did ends there.


This is the gap I hope to fill. In addition to a sneaky breeze this gap also lets in antechinus, snakes and allows dropped cutlery to escape into the wild.

The recommended procedure says to soak the paper in a tow mixer designed to shred the softened paper and mix in the cement.

I shredded my paper...well ripped it up small, and soaked it in water in a bucket
 I was only doing a small test patch to see if it will work so I began by tearing up a bucket full of newspaper. The paper soaked for a week so it was good and soft.

I used a half bag of cement mix I had in the shed.

I added the whole half bag of cement...forgetting to pour off the extra water.

I mixed the lot into a sloppy slurry and began to pack it into the gap. The bucket full of goop went further than I thought it would, but it is still very rough and I think it will crack when it dries.

The filled up gap

As you can see it's rough.

While this was a very quick and dirty experiment I can see a lot of potential for this building material. If the papercrete holds in this gap I am thinking of using it to fill the gaps and cracks around doors and windows. I might even go as far as building a tow mixer to make HUGE batches as I am lucky enough to have access to almost unlimited newspaper.

 In other news...I went on a little field trip to the Museum of Contemporary Art in Brisbane last weekend and found this amazing piece there. It reminds me of the tumors that grow on really old gum trees.


Friday, 3 June 2016

Finished my degree- now on with life

Well...not quite. I still have the matter of a ten week intern-ship to complete (trying not to stress too much), but the academic part of the degree is finished. It has been a long four years of study, most of it enjoyable, some of it torturous (maths units spring to mind) but all of it educational.

By the end of 2016 I will be a fully qualified, card carrying Primary School Teacher.


The last four years have been spent largely either working or studying, with little snippets of craft or building squeezed in around them. Now I plan to spend some time....

Building the garden;
Building a new cover over the trailer bed and replanting.

Refurnishing the Hugelkultur beds and planting.


Crafting with fibre;
Making fulled bags


Spinning cotton and wool

Knitting

And more knitting

Dyeing homespun yarn

A lot of homespun yarn


Building my business;

Trying to attract more customers

Adding new products...both hand made and....

Naturally harvested.

Learning new skills


Increasing my stock


Building a house;

Well...maybe I'm dreaming.


Spending time with my animals (and family and friends);


Also...enjoying the finer things in life;

Like unravelling old jumpers by the fire...with wine

And watching sunsets...with wine.


It has been a long, life changing journey so far, I wonder what will happen next?