The wide ranging experiences of someone who lives in the Australian bush in a knocked together tin shed with a heap of animals and still manages to hold down a job, study full time and raise a family.
Having recently discovered a great website called 'Trash is for tossers', I decided to have a go at making and using one of their recipes; a toothpaste alternative (even less rubbish for the dump bag). The 'Trash is for tossers' website has some great cleaning alternatives and tips for reducing waste. Of course some of the suggestions and tips seem very self evident too, but that is to be expected as the writer lives an entirely different lifestyle to me; she lives in New York, in an apartment, and I live in the Australian bush, in a humpy.
Toothpaste recipe
3 tablespoons coconut oil
1 1/2 tablespoons bicarbonate of soda
25-30 drops peppermint oil (food grade)
Instead of peppermint I used orange oil (That's what I had).
The ingredients in the container, still quite hard
I added hot water to the saucepan, but didn't have the hotplate on as the container is plastic.
We have toothpaste.
I used about a teaspoon for my first brush.
As the instructions stated, this toothpaste is much saltier than commercial paste and it doesn't foam, but my teeth are clean and my mouth feels refreshed and strangely cleaner than usual. I think I will persevere with this new paste and see if it helps clean my chronically coffee stained teeth. Maybe I could add a few drops of peroxide to the mix.
What do you think of this simple recipe? Will you try it?
If you do, I would love to hear your experiences and improvements.
As most of you already know; I am a witch. I celebrate the Wheel of the Year, I follow the basic commandment of 'An it harm ye none, do what thou wilt', I believe in the three-fold law and I collect information. Being a witch is (for me) about learning new things and exploring new ways of looking at life. Being a crafty witch, I make my own tools.
One of the most important tools a witch has is her (or his) books, they hold the tiny crumbs of wisdom and knowledge we manage to gain in our life and can be passed on to another witch to use once we die. I make my own books; one for every new 'subject' (although they all interlock in some way); I made a massive, red leather, hard covered, parchment filled tome for my Book of Shadows (tools, correspondences and rituals); I made a cute little upholstery fabric covered book to record my life changing journey through the Sacred Cord (sort of like a rosary that takes two and a half years to complete); I made a black suede, hard covered slim lined book to record my divinations and dreams (Tarot, runes, iChing, scrying, etc); I made a decorated hardwood, post bound tome for my Tarot learnings (meanings, correspondences, Kabbalah and, layouts, etc) and now I have made a versatile, refillable, black leather traveller's journal for my Kabbalah learnings.
My first Book of Shadows
My Sacred Cord book
My divination book
The cover of my Tarot book
Inside my Tarot book
Because I used what I could find about the house, my journal is a rough item, but I am fairly pleased with it. The first thing I did was; make a cup of coffee (essential to the creative juices), then I got down to business. I wanted the pages to look old and worn so I found a ream of photocopy paper, carefully folded each page in half (not the whole ream, only about 32 pages), dipped each one individually in strong instant coffee and laid them out on a towel to dry. This makes the pages unpredictably brownish yellow with blotches (perfect for that aged look).
My instant coffee bath
Some of the pages laid out to dry
You can see the difference in colour between the new paper on the left and the coffee stained stuff on the right.
While the pages dried, I dug out an old leather skirt (it was the eighties OK) and cut a piece that was 2 cm or so higher than the folded A4 paper (A5 size page) and 6 cm or so wider than an open sheet of A4 paper (A4 size page). The leather was fairly thin and would have been too floppy for a book cover on its own so I also cut a piece of heavy duty interfacing and some pretty orange material the same size as my leather.
Old leather skirt
Heavy duty interfacing on top of the material square
These three sheets were glued together with the interfacing in the middle, clamped and hung to dry for a while.
My cover drying in the breeze.
While the cover dried I began making the note book to go inside this cover. I followed the clip below to the letter, but my finished print block was much messier than hers. Undeterred, I decided it added to the antique-y charm of the project and used it anyway. Unfortunately I didn't take photos of this step (I got lost in the process and forgot what I was doing).
I then trimmed the outside edges and punched some holes in my cover and threaded hat elastic through them in the sequence described in the clip below.
Here is the inside of my cover with the elastic in place.
Next I simply threaded my text block into the elastic holders and it was finished.
Spot the dog loved it; a leather paw rest, how innovative.
Then I started filling it up with collected bits of understandings and knowledge.
The three elastic bits mean I can add another two text blocks as I fill the original one up.
I loved making this project, I think I will make some more soon.
Somewhere down the track, I have plans of making my two daughters a book each and fill them with little snippets of information I think they may need, the sort of thing you ring your mum for...like;
'How do I unplug the bathroom drain..without putting my fingers in there?'
'How do I make pancakes?'
'Is it better to close the windows in a wind storm or leave them open?'
'Where do I go to register to vote?'
'How do I make soap?'
'What herbs are good for a cold?'
and many others.
Maybe one of these journals would be appropriate for that, new books can be added as more questions arise.
What do you think of this project?
Do you like the old and battered look for books and journals?
For a while now I have wanted a loom wide enough to weave material for clothes making. At last I have saved up enough to buy the materials I need to build one. My first step was to rough (very rough) out a design for the loom;
I want the weaving width to be about 70 cm. So I bought myself a 70 cm rigid heddle (a frame which lifts the warp threads up and down to facilitate weaving) and designed the rest of the loom around it.
My rough design.
The YouTube clip below inspired my design, but I added a way to wind warp from the back beam to the front beam so I could weave longer pieces.
The rigid heddle replaces both the shed stick and the string heddles used in the clip. To be able to use it I will have to add holders at the side which hold the heddle in either the top, neutral or bottom positions, as you can see in the clip below;
This is the design I eventually came up with.
This is the heddle guide in action.
This is the rigid heddle; the entire loom is built around this piece of equipment.
I measured the frame pieces and made sure the heddle would fit nicely inside it.
Then I cut the frame pieces using this nifty gadget I found in the shed.
Rabbito joined me for the cutting part and offered sage advice like "OOOh, mind your fingers"
Puddle duck looked on suspiciously and made loud quacking noises.
I used these corner bracket thingies to hold the frame together.
The heddle fits perfectly and the frame is strong. Note that the side pieces are positioned inside the top and bottom pieces so that the pressure of the warp will not be only on the brackets.
I then measured the 'legs' to be the height I wanted as per the clip instructions and cut them on the handy gadget.
These two bits are my warp and cloth beams. I will explain them in more detail below.
This diagram might help you understand what I am on about.
The warp and cloth beams on my loom are not attached as they are on a normal rigid heddle loom. Instead they rely on the warp (and some shoe laces) to hold them to the frame. On most looms the beams act as storage for the warp and cloth as well as being a tensioning device (keeping the warp tight enough to weave on). On my loom the two beams will be bolted together (as in the original design clip) to act as a tensioning device and the two bits of PVC pipe will act as the rollers for the warp and cloth. The rollers have an apron rod attached (to anchor the beginning and end of the warp) and holes drilled at intervals around the edges to align with a hole in the beam so pegs (nails in my case) can be used as both a crank handle and pawl so the warp can be moved through the loom while still maintaining warp tension.
The long bolt things pass through the beams and the wing nuts are used to fine tune the tension.
This is the loom with it's first warp. You can see how the tension device works.
A closer look at the beams with their PVC rollers.
This is the beginning of my next project; a woven bag.
Using the rigid heddle is so easy and quick. I love my new loom and I love that I made it myself (with minimal help from my partner). If you are wanting a quick to build, cheap loom this is the design for you. In total this loom cost me $120 to build, including the rigid heddle.
The scarf is finished.In the end I used a hem stitch to secure the warp. It turned out a bit bulkier than I like, next time will be better.
I am extremely happy with the weaving though.
After a cold morning spent drinking coffee and googling garden upcycling ideas on my phone, I decided to use an old chest of draws from the 'to burn' pile as a useful garden feature. My daughter and I dragged it around to where we wanted it, lined the draws with builders plastic (also reclaimed), filled them with chook compost and potting mix and planted some Johnny Jump Ups in them. We also sprinkled around some seeds for Love in the Mist (Nigella), calendula (pot marigold) and marigolds to add some more colour to the mix.
We also planted out some old terracotta pots with flower seedlings and seeds and left them lying artfully around. I must say the entire experience was very satisfying.
Until recently I have not been a flowers person; I prefer to grow food and herbs, but lately I find myself drawn to colour and flowers in the garden. Maybe I'm getting old.
I can imagine this feature spilling over with green, purple and yellow in a month or so, can you?
I have been posting a lot of craft related things lately, simply because that is what I am doing at the moment. So I thought I would post just one more (that's what I tell myself about chocolates too).
I created this knitting pattern for one of my phone cosy designs but you could use it on any knitted item.
It's not very clear but the guitar is in white on blue on this phone cosy.
Guitar colour/stranded knitting pattern.
Name: Guitar
Note: For stranded knitting or knit, purl patterns
Description:
Today we are celebrating Lammas; the festival of first harvest, or the bread feast.
At Lammas we harvest seeds from our crops; an activity filled with symbolism. When we harvest seed from our crops we are reaping the rewards of our labors during the season (if I hadn't planted, weeded and carried bath water to the silverbeet all summer, I wouldn't be harvesting seeds from it now), we are also gathering the hope for future seasons (I will plant the seed I harvest to grow more silverbeet).
The song 'John Barleycorn must die' is a song about the yearly cycle of grain growing...symbolically.
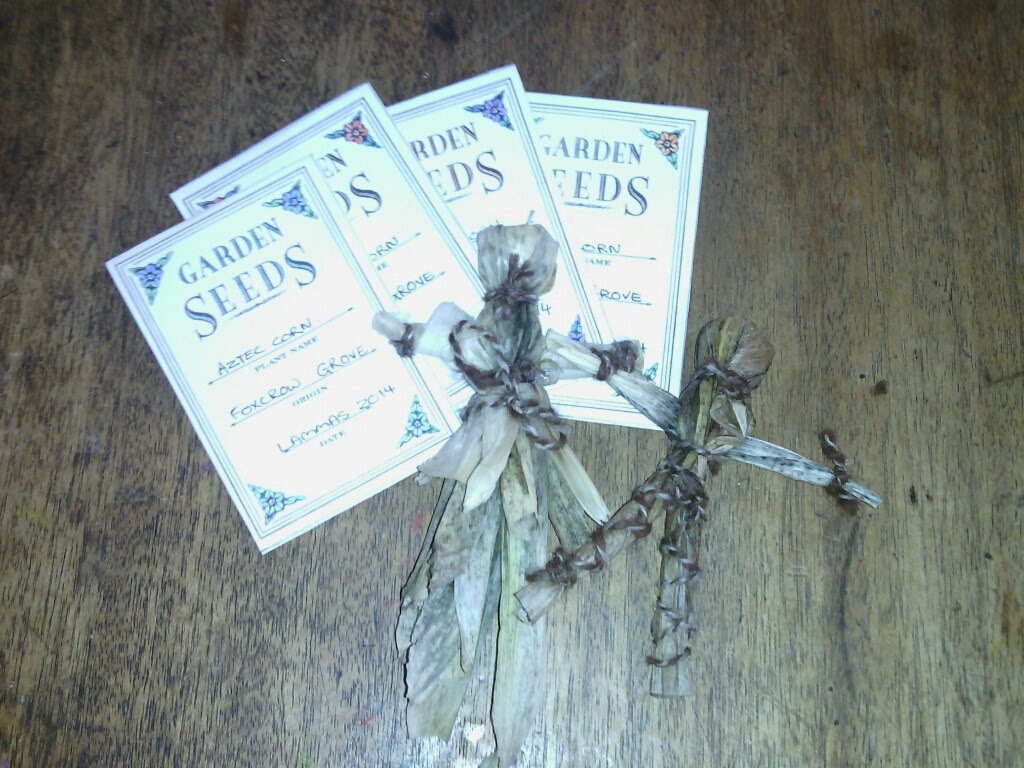
This year we made a bread man to share and harvested the corn we planted in the sacred garden at Ostara. We also made some corn dolls to be buried with the corn when we plant it next Ostara.
Corn dolls are a really old tradition/ art from our various ancestors; making a doll from some of the harvest gives the spirit of the grain a place to live until it is planted again. They also make a sweet little decoration for the altar.