Showing posts with label building. Show all posts

Monday 30 December 2013

A floor made from old tyres


My eldest daughter is home from university, having finished her degree. She will be living at home until she graduates (July), meaning that we now need more room. When she left for uni three years ago I erroneously  assumed that meant she had left home so I converted her bedroom into a craft/storage room. Having failed to comprehend the vast array of time off uni students have; I then had to relegate her to the fold out lounge for semester breaks, study weeks and holidays. Now she is home for a six month stretch and in need of a space of her own. It was decided to build a floor on the inside dirt patch that we always planned to cement (but didn't) and move the lounge area there so she could have a room with a window next to her sister.

Having looked around for the cheapest option we decided on 'yellow tongue' flooring over a suspended frame of some kind. Some research revealed that foundations and piers are often made from old tyres, so it was off to the massive pile of old tyres left at the front of our property by a previous owner. We have been using these tyres for many purposes over the years and we hope to clear the pile by 2020 or so by making them useful.


After an expensive trip to Bunnings, we were ready to build.....


The yellow tongue ready to be painted.


We painted one side with a water proofing paint containing tar.


The second coat made them much darker.

The site of the future lounge room.


We leveled off the floor and began to lay tyres out.

The old dog looked on; confused, as we built.


We found a place in the creek where gravel washes into a basin and collected a trailer full.


The tyres were filled with gravelly soil mixed with cement and left to set. 

Black plastic was laid down and the yellow tongue screwed down.


This turned out to be a bit too bouncy for a lounge room floor; so the panels were taken off and we all stood scratching our heads and looking for a solution for a while.

Eventually we got some 4' X 1' timber from my parents scrap pile (sorry 'might be useful one day' pile) and screwed it down to form a base for the panels.

Everyone had a go at the drill.

The panels were then screwed down over the black plastic liner (painted side down).


The floor was then painted with floor oil (which includes a varnish)

And the holes where filled with spak filler.

We now have a new lounge room floor and will be lining the ceiling and putting up wiring for lights tomorrow. My daughter has room for a bedroom of her own and we have used thirty three tyres from the pile. It looks great and feels good to walk on too. I am thinking of renaming our house 'the rubbish house' because we use so much rubbish in the building of it.

What do you think of our new floor??

Saturday 23 November 2013

A new tank water level indicator


Today we (and I use the term loosely) put in a water level indicator on the new header tank. I wasn't much help as I damaged my knee putting the header tank in and am currently wearing a very fashionable leg brace. My partner found an indicator kit online, it's Australian made and owned and uses about 50% recycled items. He is so impressed with it that he is going to stock them at work (Rural Energy Supplies).

This is what came in the kit, along with some clear, easy to read instructions; fishing line, a sinker and a fishing line guide thingy.


Then the instructions are pored over by all involved.

The basic idea is to take a coke bottle and a milk bottle; seal the coke bottle up so it's air tight and fill the milk bottle with sand and water.

The coke bottle is properly sealed up with silicone

The milk bottle is filled up with sand

The sand-filled bottle is then topped up with water


Fishing line (supplied) is then passed through the little guide thingy (supplied) and one end of the fishing line is passed through a pre-drilled hole in the top of the tank. As our hole in the top of the tank was on the opposite side of the tank to the inspection hole we had to spend a long time swearing and cursing while trying to hook the fishing line inside the tank with a piece of bamboo.

The fishing line end inside the tank was then passed through the handle of the milk bottle and tied to the coke bottle float. The milk bottle was then lowered into the bottom of the tank.


The coke bottle float in the tank


Finally the sinker was tied to the outside end of the fishing line so it hangs at the current level of the water in the tank. To avoid frustration it is really important to remember/write down/tell someone what the measurement is when measuring the water level inside the tank so it can be transferred to the outside of the tank.


Measuring the current water level


The final result.

Now I can check the water level of the tank as I walk home from work, instead of climbing the ladder, unscrewing the inspection hatch and looking in, or smacking the side of the tank; I am very impressed.

Saturday 9 November 2013

Upgrading water storage capacity


It hasn't rained for a while here and the big (22000 litre) header tank is empty. We still have two 4000 litre tanks full, but things are getting desperate. A lot of our neighbors are already buying water, so I consider us lucky to still have as much as we do. The header tank being empty means we have had to go back to bringing all water into the humpy in a bucket; bath water (3 buckets a day), washing up water (1 bucket a day),clothes washing water (12 buckets a week) and then carry them out again to put onto the garden. I had forgotten how convenient it is to have a tap in the house. My partner has been avoiding putting the new header tank in for some time, but a week of carrying his own water in and out of the house convinced him to take action.

As the header tank is empty, we thought we would take advantage of the opportunity to replace it with the 27000 litre tank we bought (second hand) from a neighbor a few months ago. The old header tank (22000 litres) is destined to be moved down to the humpy to provide western shelter to the living area and to take full advantage of the harvesting capacity of the roof. The actual process of juggling tanks was long, drawn out and frustrating;


The green tank is the old header tank (22000 litres) and the black one is the new tank (27000 litres).

The first order of business was to move the old tank out of the way. We tied a strap around the top of it (after all the pipes were disconnected) and pulled it over with the car.


The figure of eight knot my partner used to be sure we could get the strapping untied again after the job.

Ready to be tipped over

The tank tipped over and ready to be rolled away to it's new home.

After much maneuvering we managed to get the new tank into position; now to tip it over onto it's base. 

The old tank rolling away towards the humpy (causing much ado with attendant swearing, running and flapping of hands). We stopped it with a conveniently placed tree.

The second attempt at flipping the tank over onto it's base. There were many more. Eventually I had to drive the car while my partner levered the thing upright with brute strength (which I greatly admired).


Upright at last, still with the rope attached'

The tank was then towed, via a rope around the base, back to the tank pad of sand the old one had been sitting on.

My handy partner then attached all the attendant pipes and we were ready to pump up the 4000 litres from the house tanks.


We have water in the header tank again. It should last us another month (at the rate of 1000 litres per week).
A storm is threatening as I type, but as yet there is no rain.

While we were fiddling around with the tank I had the opportunity to watch cicadas metamorphosis from an underground dwelling beetle-like being into a flying insect. I got photos in between exciting tank chases and tank tipping exercises.

At this point she was just emerging, wet and raw from the shell of her old body.

A side view
Another one, fully emerged and waiting to dry.


They will be noisy in the bush by December; thousands of cicadas calling for a mate, hundreds of birds feeding young off the bounty of a cicada hatching and one or two hawks, goannas and kookaburras feeding off the baby birds. What a rich ecosystem we live in, even when it's dry.


Is it dry in your area? How do you cope with the shortage of water?

Saturday 12 October 2013

Eco bricks; Making use of rubbish

Lately I have been thinking about rubbish; specifically the plastic and foil bits that seem to be wrapped around everything these days. We have no rubbish pick up here. No magic bin that mysteriously empties itself if I leave it by the road on a Tuesday night. We take our rubbish to the dump in the trailer and pay for the privilege of leaving it there (we also pay $150 a year to maintain the local dump on our rates). So I have started to think about ways to reduce our rubbish production.

We buy in bulk where we can and I send refillable containers to the local co-operative to be filled up with washing powder and detergent. Glass, recyclable plastic containers, aluminium and tin cans are taken to a recycling centre periodically. Food scraps, paper and cardboard are used in the chook pen for composting. That only leaves that annoying plastic; plastic wrap, Styrofoam trays, chip packets, chocolate wrappers and plastic bags. We commonly fill about one grain bag (20 litre size)  per week of non-recyclable plastic.

 I think I have found a solution at last;


Eco bricks. They have been used to build schools and houses in third world countries for a few years now and provide a handy way of getting rid of rubbish that would otherwise go into landfill.

Basically they involve stuffing clean plastic rubbish really tightly into PET bottles until they are full and hard, then put the cap back on. I have been making them for about two months now and have managed to produce about two a week. I never thought I would be thankful for my partner's coca cola habit, but he manages to provide just enough bottles to keep up with the plastic we produce.


Step one; collect all the clean plastic rubbish you can (wash it if you have to)


Step two; using a stick or an old knitting needle, shove the plastic rubbish down into the bottle.


 Pack it down tight.

Keep filling until you can't jam any more in, then put the cap back on.


Stock pile them somewhere and use them to build.

Beautiful buildings like this.

Maybe I will collect enough to build the toilet out of them.......

Is this idea too crazy?? Can I get the local council to approve? What do you think?

Friday 27 September 2013

Carrot towers; an experiment in intensive growing


My little Purple Dragon carrot seedlings are growing up so fast so I thought it was time to start experimenting with ways to grow them.

We have no topsoil here at all (well a few centimeters in some places) so I have been thinking about raised beds for carrots for a while, then I came across this idea, called a flower tower and thought "Why not try it with carrots?"

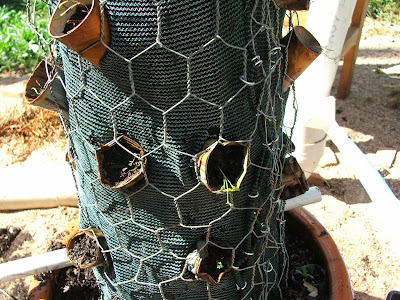
As you can see, I built the frame as per instructions (see the 'flower tower' link)

Then I found a stray piece of PVC pipe and thought it would make a good water delivery system.

So out came my trusty drill

Dozens of holes were randomly drilled all over. I also plugged one end with a sink plug.

The pipe went into the middle of my frame, plugged end down.

Then I filled the lot with potting mix and compost.


I also added some PVC pipes through the bottom, sticking out about 25cm, to provide supports for the cover.

The seedlings were poked through the shade cloth into the potting mix. A job which took ages.

I planted a tomato and a love-in-a-mist in the top to provide colour and shade to the carrots (and maybe even tomatoes)

And marigolds around the base, for companion planting and for more colour.

The wire cover went over the whole lot and the seedlings watered in

Then I added an old sheet over the cover because it's a windy, hot day and the little seedlings need all the cover they can get for a few days.


The result so far is a mysterious, sheet covered mound. I have some concerns about this method;
If the carrots grow straight down, will I be able to harvest them?
Will I be able to keep the water up to them?
It is a time consuming business, putting the carrots through the shade cloth, is the yield worth the time?

I only planted 10 carrots in the tower as a trial run, but if it works there is room for 50 in just this little tower so the method certainly is space saving.

I will keep you posted on the progress of this experiment.