Showing posts with label building. Show all posts

Saturday 12 October 2013

Eco bricks; Making use of rubbish

Lately I have been thinking about rubbish; specifically the plastic and foil bits that seem to be wrapped around everything these days. We have no rubbish pick up here. No magic bin that mysteriously empties itself if I leave it by the road on a Tuesday night. We take our rubbish to the dump in the trailer and pay for the privilege of leaving it there (we also pay $150 a year to maintain the local dump on our rates). So I have started to think about ways to reduce our rubbish production.

We buy in bulk where we can and I send refillable containers to the local co-operative to be filled up with washing powder and detergent. Glass, recyclable plastic containers, aluminium and tin cans are taken to a recycling centre periodically. Food scraps, paper and cardboard are used in the chook pen for composting. That only leaves that annoying plastic; plastic wrap, Styrofoam trays, chip packets, chocolate wrappers and plastic bags. We commonly fill about one grain bag (20 litre size)  per week of non-recyclable plastic.

 I think I have found a solution at last;


Eco bricks. They have been used to build schools and houses in third world countries for a few years now and provide a handy way of getting rid of rubbish that would otherwise go into landfill.

Basically they involve stuffing clean plastic rubbish really tightly into PET bottles until they are full and hard, then put the cap back on. I have been making them for about two months now and have managed to produce about two a week. I never thought I would be thankful for my partner's coca cola habit, but he manages to provide just enough bottles to keep up with the plastic we produce.


Step one; collect all the clean plastic rubbish you can (wash it if you have to)


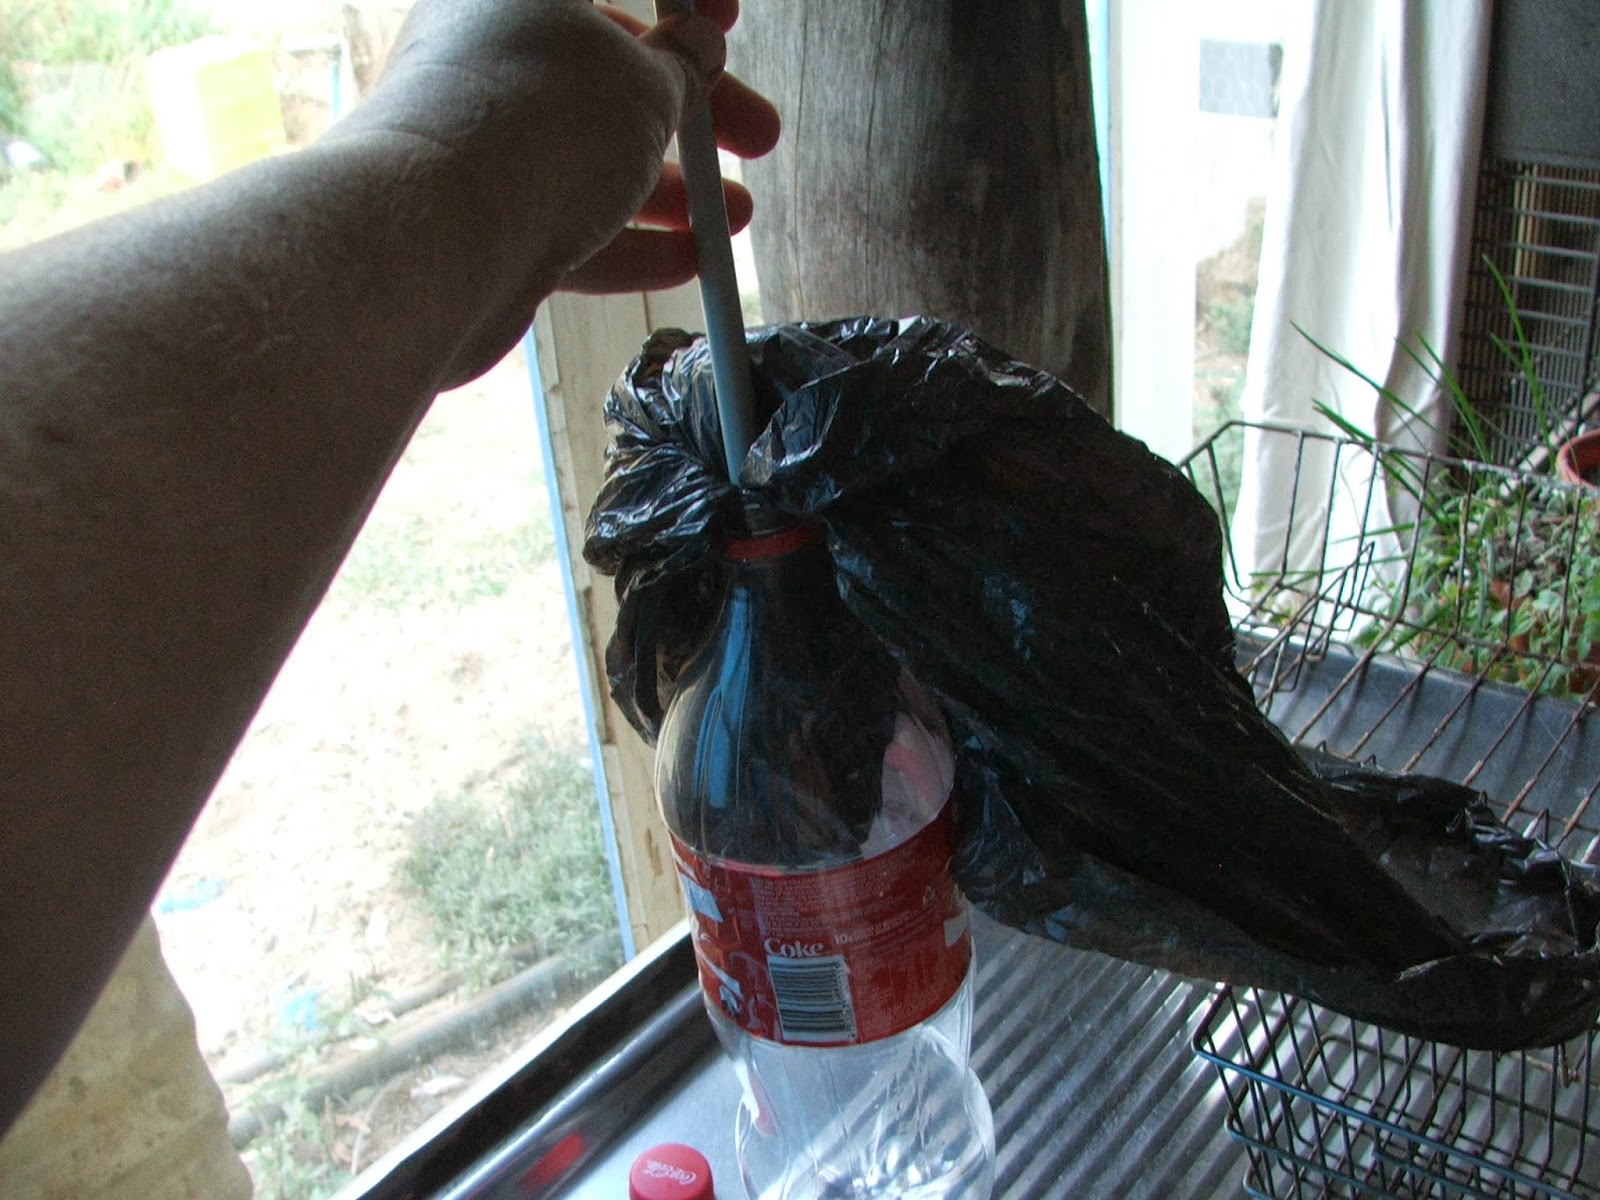
Step two; using a stick or an old knitting needle, shove the plastic rubbish down into the bottle.


 Pack it down tight.

Keep filling until you can't jam any more in, then put the cap back on.


Stock pile them somewhere and use them to build.

Beautiful buildings like this.

Maybe I will collect enough to build the toilet out of them.......

Is this idea too crazy?? Can I get the local council to approve? What do you think?

Friday 27 September 2013

Carrot towers; an experiment in intensive growing


My little Purple Dragon carrot seedlings are growing up so fast so I thought it was time to start experimenting with ways to grow them.

We have no topsoil here at all (well a few centimeters in some places) so I have been thinking about raised beds for carrots for a while, then I came across this idea, called a flower tower and thought "Why not try it with carrots?"

As you can see, I built the frame as per instructions (see the 'flower tower' link)

Then I found a stray piece of PVC pipe and thought it would make a good water delivery system.

So out came my trusty drill

Dozens of holes were randomly drilled all over. I also plugged one end with a sink plug.

The pipe went into the middle of my frame, plugged end down.

Then I filled the lot with potting mix and compost.


I also added some PVC pipes through the bottom, sticking out about 25cm, to provide supports for the cover.

The seedlings were poked through the shade cloth into the potting mix. A job which took ages.

I planted a tomato and a love-in-a-mist in the top to provide colour and shade to the carrots (and maybe even tomatoes)

And marigolds around the base, for companion planting and for more colour.

The wire cover went over the whole lot and the seedlings watered in

Then I added an old sheet over the cover because it's a windy, hot day and the little seedlings need all the cover they can get for a few days.


The result so far is a mysterious, sheet covered mound. I have some concerns about this method;
If the carrots grow straight down, will I be able to harvest them?
Will I be able to keep the water up to them?
It is a time consuming business, putting the carrots through the shade cloth, is the yield worth the time?

I only planted 10 carrots in the tower as a trial run, but if it works there is room for 50 in just this little tower so the method certainly is space saving.

I will keep you posted on the progress of this experiment.

Saturday 7 September 2013

Short drop toilets

This may be a bit of a taboo subject in polite society...but it is a very important subject for those of us who choose to be responsible for as much of our own lives as possible; toilet designs.
Until recently I have been happy using a short-drop toilet design on our block; this consists of a vase shaped hole about 1.25 meters deep, 60 cm wide at the bottom and tapering to about 40 cm wide at the top. On top of this pit is placed a movable pedestal made from half a plastic live barrel with a toilet seat bolted on top. A tarp stretched over a poly pipe hoop frame completes the set up. We 'flush' by sprinkling a can of lime over the contents to lower the pH and make the contents more worm friendly and less fly friendly. This kind of toilet means that I have to dig a new hole every school holidays.


Lately I have been experimenting with adding compost worms to the mix. Once a new hole is dug and in use for a week or so, I tip in one container of compost worms from the worm farm at school. This makes the hole last roughly twice as long as previously; presently 20 weeks is the record. This means I have to dig less and can avoid the deconstructing and reconstructing of the toilet for a bit longer.

My new plan consists of digging a big enough pit to hold a year's worth of...well....contents, and adding worms to that. I am hoping this will allow enough time for the worms to reduce the contents to worm castings and baby worms, which will then burrow away to seek a new life in a far off place, thus keeping the pit level to an acceptable level permanently (or at least a very long time). Then I can build a more permanent and attractive structure over the top of the pit.


According to the World Health Organisation Pit Latrine Designs, when digging a pit toilet you should allow  0.06 m3 per person per year. In our house that equates to (0.06 x 4 = 0.24 m3) to allow for visitor usage as well. This isn't a huge hole really. I have calculated this to be about the size of a 240 liter fridge.

I am currently digging away at the pit for this toilet and will post more photos as I get to each stage. The ground is very hard at the moment due to the dry weather so going is slow. The next question will be "What do I build the toilet shed out of?"

Do you take responsibility for your own waste?
Would you like to?
Any ideas or comments welcome.

Saturday 6 July 2013

stage two Hugelkultur bed in progress

Today has been a lot of fun; we cleared up a pile of saplings from the front yard that had been cut down because they were shading the solar panels. My partner had a rare day off, so I made him cut up the whole pile of saplings with his handy chainsaw.


 The saplings became my next Hugelkultur bed.


In the process of cleaning up the saplings I decided to use an old half tank as a Hugelkultur bed too.


Then my sister rang and offered me some good red soil from her holiday home (just up the road) so off we went to pick it up.


Red soil from my sister.
Tomorrow's adventure is to get all that lovely soil into the stage two bed and mulch it over.
I really need to get some seeds and seedlings soon!
I am really enjoying this process.

Wednesday 3 July 2013

Stage one of the Hugelkultur experiment complete

Today I have had a lot of fun. My daughter and I dug some more soil from the future toilet pit to finish off the stage one hugelkultur bed. You can see from the photo how rich the soil is down near the dam.


The future toilet pit


Soil added to the bed


Amazed and delighted sheep

Then we spent a while cleaning old straw (well, compost now) out of the sheep shelter, much to the amazement and delight of the sheep. This became the mulch for our new bed, and the whole lot was watered in well.
doesn't that look pretty?

Tomorrow I will spread blood and bone and then let the planting begin!!

Then its on to stage two; build another bed next to that one and so on until the chook runs are full.