Monday, 25 August 2014

An old sewing machine reborn - testing Daisy's sewing ability.


Daisy, ready to sew


My last post was about my efforts to fix up an old Singer 201K treadle sewing machine; Daisy.
To test her ability to sew (and make all those little adjustments) I made up a new peg bag for the line.

Daisy sews well...even though the 201 is a straight stitch only machine, the stitch they sew is strong and even (when the tension is right), and they can sew through a single layer of cotton and straight on to leather without any adjustment.

Daisy doing what she was made to do. Making a happy little hum.

A closeup of the top stitch, set on 8 stitches per inch

A closeup of the bottom stitch, set on 8 stitches per inch

This is how I iron when sewing; the old iron is made from really heavy aluminium, it heats up and stays hot.

I iron on a folded blanket on the table. 

The finished peg bag, it turned out well, except for some pinches in the corner of the opening (my mistake, not Daisy's)

Daisy all set up to sew

Daisy, packed away nice and neat

So Daisy the Singer 201K is fixed, adjusted, oiled and polished. Ready to go to her new home, once I print out a manual and whip up a pin cushion.
The advantages of using a treadle machine are many;
uses no electricity (you can sew in a blackout)
the machines are virtually indestructible (I'm sure they would survive a bomb blast)
The stitch is even and strong and the sewing is quiet and easy
The machines are beautiful to have around 
You get some exercise while sitting down sewing

Do you know anyone who wants her?

An old Singer sewing machine reborn


A few weeks ago a friend gave me the huge gift of a Singer 201 treadle sewing machine. I am not a sew-er (yet) but I have fallen in love with these old sewing machines. They are such well made machines (how many cars are still going after almost eighty years?) and they have a certain grace and beauty about them. I restored one for myself several years ago, then one for my youngest daughter last year (she likes to sew). Now I have a new project to play with.

First some background.......
Singer sewing machines in general.
The 201-1 specifically
The cabinet (model 46)

Finding her age and place of birth.....
Her serial number is; EC664342. The SingerCo site says she was made on 6th March, 1940 in Clydebank, Scotland, making her 74 years old this year.


How to refurbish the old girl.......
A very useful blog
Another useful blog with detailed pictures
A great source of parts for all sorts of sewing machines


My first move was to oil all the inner workings with 5 in 1 oil (Singer oil is better, but I didn't have any), this let me feel where the sticky bits are as I turn the wheel and treadle the peddle (so to speak). I also wiped the old girl down with a rag and 5 in 1 oil to start the cleaning process.
She was in fairly good shape; just needing a spray of kerosene in the inner workings to ungum all the moving parts. Basically I squirt kerosene into all the oil holes, remove the face plate and inspection plate then squirt some kerosene in there too and drip some around any moving parts. After sitting like this overnight I wipe her all down with clean rags, take off any bits that still look grotty and scrub them with an old toothbrush (and kerosene of course).

The next step is replacing any worn parts; she only needed a new bobbin winder ring, drive belt and some new needles and bobbins.

Last of all is the fiddly bits; cleaning and calibrating the tension assemblies. The upper tension needed new thread take up and beehive springs (don't you love the names of these parts). I took it apart very carefully and laid each part out in order so I wouldn't get confused. I cleaned all the bits and replaced the worn parts with new ones in the line up. Then I put it all back together again, as indicated by the handy tutorial.
Of course it didn't work... after a few dozen more tries and an hour poring over the tutorial, I finally realised that I had the tension indicator on back to front (the thing with the plus and minus signs on it). After that it was plain sailing.

The lower tension/bobbin case area was easy to take apart and clean. I just followed the tutorial (a different one this time) and cleaned her up, there was a lot of dirt and lint in there.
The upper tension unit removed, look at all that dirt.

The bits that make up the upper tension assembly, hope I can put it back together.

The lower tension assembly with the bobbin case removed

The bobbin case and feed dogs, all in need of a clean
The next step is to try her out, I thought I would make a new peg bag. Then I will set her all up with;
A users manual
a pincushion and pins
spare bobbins
spare needles
a cleaning brush
a bottle of 5 in 1 oil
spare reels of black and white cotton
a tailors measuring tape

And most importantly...a name. I am thinking Daisy (what do you think?)
I plan to sell the old girl on to someone who will love her and use her to make beautiful things.
How much is she worth?

Friday, 22 August 2014

Making rag rugs, a use for worn out fabric


For a while now I have been saving (hoarding really) old sheets that are just too far gone to use as sheets anymore. Some are used to make pajama pants; the material in the middle wears out first, so I cut pants leg pieces from the edges of a double sheet and sew them up (usually flannelette sheets). Lately though, I have been reading about making twined rag rugs and decided I need a few new bathroom mats, and maybe one for the front of the sink, then one for the floor beside my bed... the list is endless.

So of course I found a great tutorial online.

The first step was to make a frame loom. I just happened to have some electrical conduit lying around (and some corners too) so I made a frame in no time.
I just happened to have the materials lying around.

The basic frame loom.

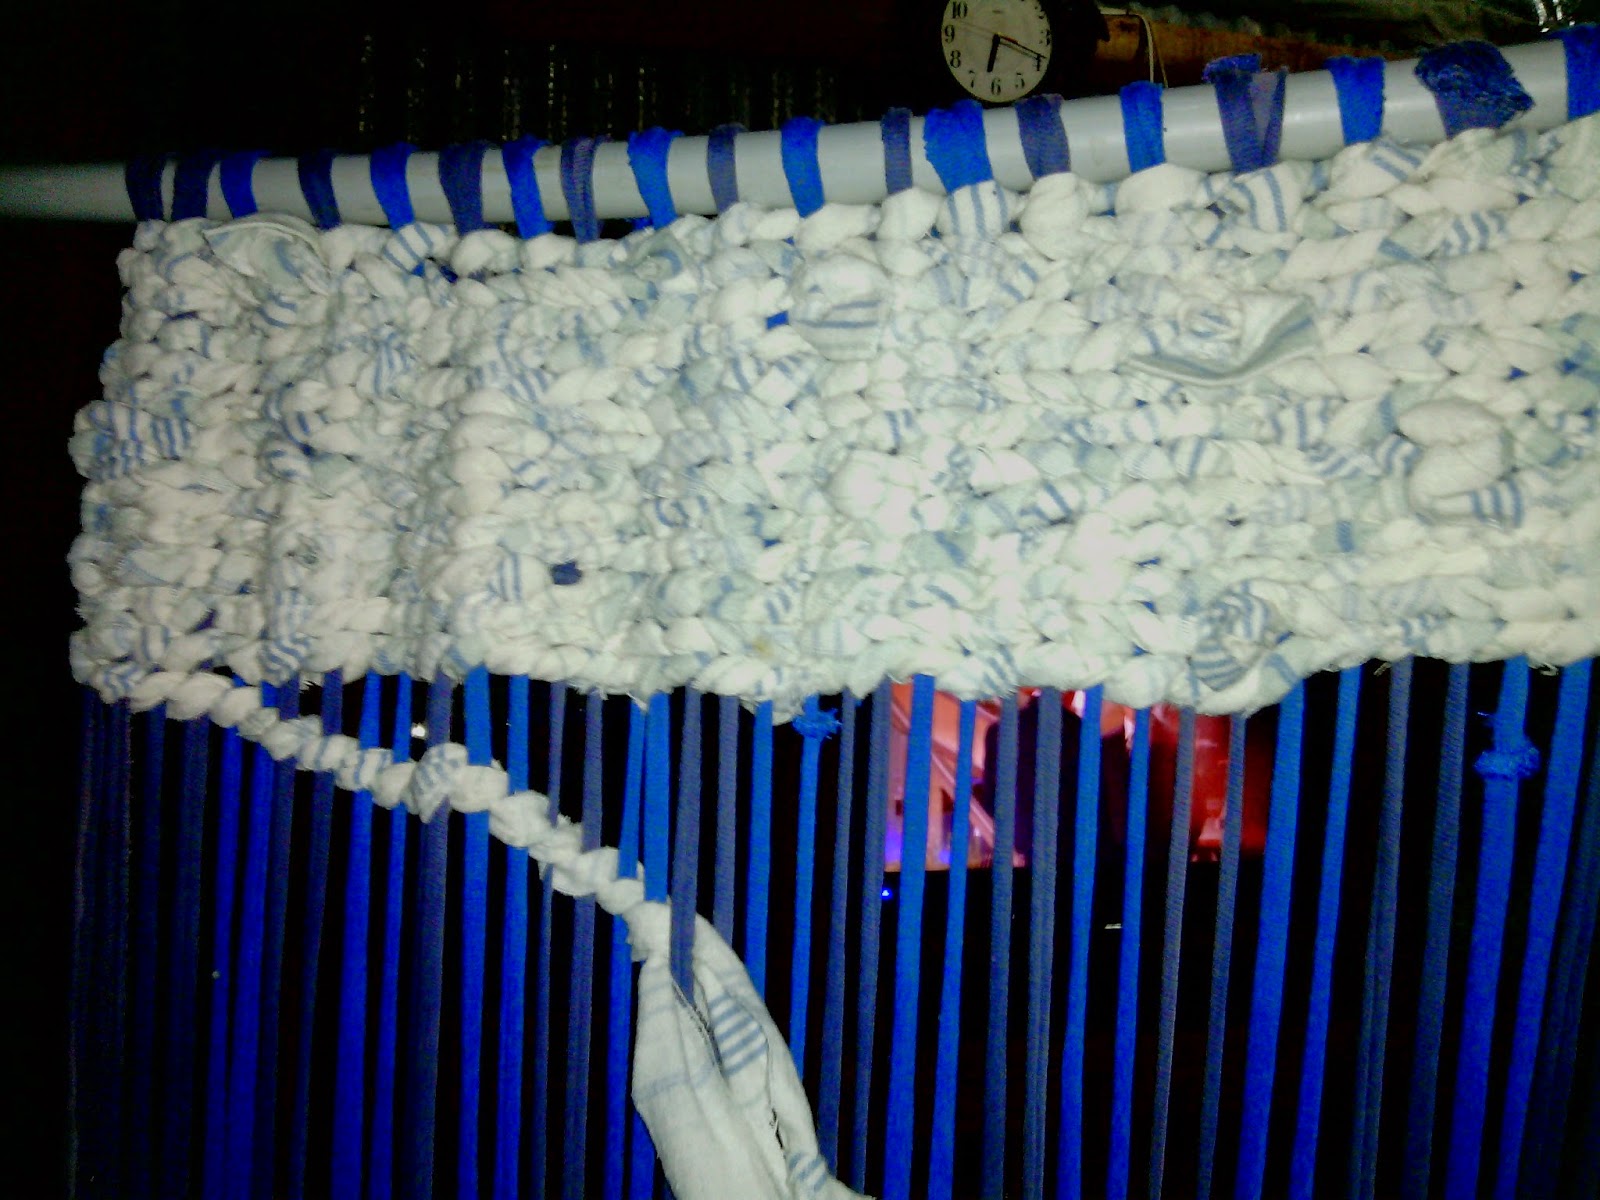
Then I cut up two old t shirts and parts of two old flannelette sheets (left over from making pants).I made the strips about an inch wide, but I wasn't very precise about it. The t shirts were cut sideways to make big loops (like huge rubber bands).

Cutting up t shirts

In weaving there are two types of threads; the warp and the weft. The warp is the 'bones' of a piece, they are the strands that go up and down and the weft threads are woven backwards and forwards through them.
For my mat, I used the t shirt loops slipped over the frame as the warp and the sheet strips became the weft.

A pile of warp strips

Making the weft strips from an old sheet

Then it was time to put the warp on the loom. I just slipped the strips over the outside like big rubber bands. It made a nice tight warp.

The warp on the frame, ready to go.

Then it was time to start twining; I just followed the tutorial until I got the hang of it. It was surprisingly simple, the turns at the end of the row were the hardest to learn.

The first few rows

Getting there
The finished rug still on the loom.
When the rug was long enough, I cut the bottom of the longest warp loops and tied them in a granny knot. The top of the loops were slipped off the bar (I had to take the loom apart to do that) and they pulled back into the mat as I tightened the bottom loops.
The whole mat is thick and soft. I think they will make excellent bath mats. It took about a week of evenings sitting and twining to finish though, so this is not an instant project.


The finished mat,not a good photo I know.

I can still see the pattern of the old sheet in the weave, you can see the ends of my knots on the edge of the mat..

What else can I do with old sheets? I seem to have inherited the old sheets from several houses as friends and family realise I have a use for them. Any suggestions?

Friday, 15 August 2014

Lambs everywhere


We now have four new babies (lambs) they are all beautiful and unique in their own way. Having never had lambs before, it has been a really interesting time and  I have noticed some interesting things;

First - Lambs seem to be born just before or during rain, all three of the babies were born on overcast, drizzly days (and there have been very few of those lately). I don't know yet whether this is a fact or just luck of the draw, given the small sample size of the observations, but later years will tell me if I'm right.

Second - My girls guide each other through labour, the first girl to give birth; Kraken (she has a black spot), was alone. The other girls hung back and watched until the baby was born. The second girl; Snow White (obvious really) had Kraken by her side the whole time, licking her face and making encouraging little bleats. The third girl; Nut (and she is) had the other two mums to help her, but she went a bit weird after the birth and ran around and around the paddock like a maniac before coming back to feed her baby (which the other mums had cleaned for her). It seems to be a community event.

This is Peridot, the girl cleaning her is Kraken and her mum; Snow White, is behind her.

Third -  The mums will feed each other's babies. I noticed this with the first two babies; the lambs just go to the closest boob for a feed. I didn't think sheep did this, but obviously I was wrong.


We have three boys and one girl so far and we can't keep them all. We plan to keep Ramesses the First (our first born boy) as a wether to keep Stag (the ram) company in the lambing season. We will keep Peridot (our second born girl) as a breeding ewe. We can't keep the new boys (no name yet) and we will be making them wethers too. I hate the idea of having to eat some of these babies one day, but it might come to that if I can't find homes for them.


The mothers love their babies so much, and take such good care of them that it hurts my heart to think of taking those babies away. I have to burn the horn buds off Ramesses today and castrate the poor boy too, that will be quite enough torturing of children for one day I think.


Do you keep animals for meat? How do you reconcile the heart warming moments you observe with the eventual act of taking them away?

Does anyone want an automatic lawn mower and hedge trimmer in about three months time?

Monday, 4 August 2014

Burning off; we don't, do you?

Well it's bushfire season again. spring would be my favourite time of year if not for bushfires. In this area most people burn around their homes before summer to protect them from bushfire, unfortunately the vast majority of bushfires start from these 'controlled burns' when the wind changes and the fire becomes 'uncontrolled'. The whole argument for and against burning can get very 'heated', we don't burn but we do take some steps to protect our home from fire, now and in the future.
The CSIRO is of the opinion that fire is an essential part of our ecosystem and that we need to continue the practice to maintain the bush. Most people seem to agree with the notion that the Aboriginal peoples used fire to change the landscape so we should too, but they seem to forget that fire was used as a hunting tool and to clear migration paths not as an ecological aid. Aboriginal peoples gradually changed the ecology by using fire; species that survive and even need fire gradually became more common and the ecosystem became more and more fire friendly.
 Many Australian species rely on hot fires to germinate seedlings, these same plants are usually the ones who drop lots of leaves in the spring, have very flammable bark and catch fire very quickly. Plants that have evolved to need fire for germination do everything in their power to produce the right conditions for fire (makes sense doesn't it). Species that do not use fire to germinate tend to have more water stored in their leaves and stems, have smooth, non flammable (to a degree) trunks and stems and do not catch fire easily.

My reasoning for not burning is that species who don't use fire and are not so flammable can find a haven here, around our humpy (at a distance of about 30 metres), and will slow the speed of fires advancing on our home simply by being less flammable. We don't need to plant them, we just provide the right conditions for them to germinate (I hope). Instead of burning I choose to graze the area immediately around the humpy with sheep. The sheep clear the long, dry grass, the smaller eucalypt saplings and the lantana (slowly) and keep the area fairly bare. We also have a huge clean up every fire season to get rid of any rubbish we have lying on the ground that may provide a place for sparks to ignite. By rubbish I mean household rubbish not tree heads and such. We are gradually working to clear several piles of tree heads within the 30 metre radius of the humpy, we use them as hugelkultur material and firewood, we clear slowly so as to not kill or immediately dehome the little animals that have taken up residence in them since they were pushed up about ten years ago.

You can see how bare the ground is around the humpy

Our humpy is in a terrible position when it comes to fire danger; in a saddle at the top of a hill, a fire can come at us from any direction and be traveling uphill (and therefore faster) and the humpy itself has lots of nooks and crannies that would be spark friendly. Still we are working to correct these things and we haven't had a fire here in the six years of our residence. We may be lucky enough to make our home fire proof enough to survive the next big fire season; as long as it's not this year.
Do you burn off around your property? Do you feel safe from fires?

Saturday, 2 August 2014

It's Imbolc - we've got lambs


Imbolc means 'ewe's milk' or 'in the belly' (depending on which etymology you read), and is the time of year when chooks begin to lay again, snowflakes and hardenbergia flower, self sown seedlings begin to appear in the garden and lambs are born. I love Imbolc for the potential in the air; life is exciting and full of new possibilities. The goddess Brigid rules this time of the year, symbolising the return of warmth, creativity and home making activities.
Some more hemisphere appropriate information about Imbolc.

Hardenbergia.


And snow drops


This year we had the usual (these days) quiet little ritual to welcome Brigid back into our homes, and with her the warmth of the strengthening sun and the element of fire. We read poetry, lit candles and laid Brigid on her bed of fire. Then we had a wonderful feast and conversation.

Brigid is come, Brigid is welcome.


Imbolc is very apparent around the humpy too, with bush fires burning all around us as people light ill advised fires, chooks beginning to lay eggs again after the winter rest and lambs being born.

New flowers appearing in the yard

New seedlings in the garden

Way back in Early May when Stag (the ram) came to live with us, it seemed that lambing season was a long way off, but it's finally here. We have our first baby lamb; a boy we have named Ramesses (even though he will be a wether) he is destined to become lambing season company for our ram Stag. We watched the entire birthing process (from a distance) and after all that effort we got to go and meet him, along with the rest of his new herd.

Ramesses the first (and his mum)


Friday, 25 July 2014

Crowdfunding donation - week three


This week I chose to donate to a cause that aims to teach workshops on sustainability in Mullumbimby. One of the workshops they propose to teach is 'making rubbish bricks' and what to do with them. I am thinking I might sign up for that one when it is up and going.