Saturday 15 July 2017

Earthbag building experiment- the new bathroom- finishing the foundation

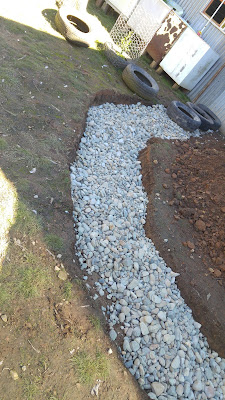
The foundations are VERY close to being finished. My partner called into Tabulam Sand and Gravel on the way home from work and loaded up another tonne of gravel (smaller pieces this time) by torch light and bought it home. I unloaded this lot into the trench, tamped it down and put the tires on top. I filled the tires one at a time with the gravel and leveled them up (they are leveled so that the walls can be built straight up, but I will have to build a few extra layers to level in the other direction).

The larger gravel in the trench.

Waiting for the next load of gravel.

A trailer full of smaller gravel.

A badly exposed photo of the trench...I just thought it looked pretty.

Starting to fill the tires with small gravel.

The tires are leveled in one direction, so the walls won't tilt.


Of course we are three wheelbarrows short of finishing the foundation. That's just the way it works.

The doggy building inspectors appear to approve.
We went to Bunnings and got a door and frame, some materials for making 'velcro plates' to attach doors and windows to (more on these next post) and some plastic to cover the walls until we can render them. Now all I need to do is find the last three wheelbarrows required for the foundation.

Next time....on to the walls.

Sunday 9 July 2017

Earthbag building experiment- the new bathroom- foundations


School holidays are here. Sixteen days of restful bliss...excepting the planning of teaching for next term (probably three days), a working bee or two to finish projects at school (two days should do it), visits to various schools to water and maintain my garden (four half days, so two days altogether) and visiting friends and family (two days). In the seven days of restful bliss left after that lot I have decided to build myself a bathroom. I'm not planning on killing myself though...there is a plan  in place. I have recently taken to wearing a fitbit (one of those wrist band things that tells you how many steps you've taken today, how many sets of stairs you climbed and how many times you got your heart rate up, for whatever reason), and the recommended number of steps per day is 10,000. So I plan to build each day (that I have to myself) until my fitbit announces that I have done 10,000 steps (which it does by buzzing in a satisfied way while showing star bursts on the screen), then I will relax and do some everyday house work stuff until the next day. That way I can be sure I'm doing the recommended number of steps per day and get a good amount of work done on the bathroom as well.

Since the brown snake incident (about 18 months ago), we have been showering outside with a bucket of warm water and a jug. Two winters of outside showering is enough for me, I want a bathroom.

Our outdoor showering area.
 After much discussion and research I decided to have a go at earthbag building. This method involves filling polypropylene feed bags with soil and stacking them into walls with barbed wire between each layer. These walls are then rendered with a mix of clay soil, sand and cow manure to protect them from the sun. In the videos and books this method looks quick and fairly easy, I guess we will see.

The first step was to find a site. My barely present partner put his foot down and refused to walk up the yard in the dark to shower each night (even though we have been doing just that for 18 months now). Building the bathroom and laundry up hill from the humpy would allow me to gravity feed the water from showering and clothes washing back down to the garden beds, meaning that I don't have to cart buckets of water around the yard every wash day. Building right outside the back door means that we don't have to go outside to shower and we don't have to carry our washing baskets up the yard to the laundry for the once a week washing day. So it was decided to put the bathroom directly outside the back door, conveniently placed for access, but inconvenient for gravity fed watering of the garden.

The 'right outside the back door' area.

The foundations will be a shallow rubble trench filled with gravel and a layer of tires on top of that (also filled with gravel). I am considering a row of bags filled with gravel on top of the tires just to provide the drainage and protection from wicking moisture that earthbag buildings require (apparently).

My first, second and third days of holidays were spent digging out the trench, a not-too-arduous job considering the usual digging requirements of foundations.


As you can see, I had the doggy building inspectors around once or twice.


Now to source some gravel for the trench and tires...

On the next available day we (my partner and I) drove down to the conveniently placed Tabulam Sand and Gravel (our local cement depot) and picked up a load of river rocks for the bottom of the foundation trench.

I couldn't believe this was a tonne of rocks.

I believed it was a tonne of rocks once my partner, daughter and I wheelbarrow-ed and shoveled it into the trench.

 You may notice that my foundation trench is very shallow. At its deepest it is only 25cm deep. Most earthbag sites say that the foundation rubble trench doesn't have to be deep, so I went with that. Also I hate digging so the shallower I could get away with the better. I plan to get another load of smaller gravel to put on top of this load and to fill the tires. That should give a fairly stable base for the wall to be built on.


This is the foundation option we have chosen Its from the book 'Earthbag building' that I conveniently have in my library.

 Hopefully I can arrange another trip with the trailer to pick up some more gravel within the next day or two. I am looking forward to the next stage; filling the bags with soil and tamping them down.


Sunday 18 June 2017

I got my red Ps


I eventually passed the driving test...
After six appointments and five actual driving tests, I finally passed. It was a frightening testament to perseverance (or bare faced stubbornness).

As anyone who knows me is aware, I am not a good driver; I'm easily distracted by interesting conversations, shiny things beside the road and even the odd profound thought, I am terrible at judging distance and am totally unaware of the width of the vehicle I am driving and I intensely dislike the whole process of driving a car. Despite all these things I finally managed to pass.

The first test I missed due to writing the time down wrong in my diary (subconsciously avoiding). The second and third tests were with a male tester who was very efficient and professional, I was VERY nervous and talked myself through the entire test (yes..out loud, complete with muttered curses and small EEKs), during this phase I found out that intersections are not my thing.

I went home and practiced intersections in my head. I drove to work most days which kept me in practice on the road at least. I am actually not bad at driving on country roads and there is very minimal traffic anyway most of the year. On my fourth test I had a female tester, she was very calming and friendly and I was able to pretend that I was just giving a friend a lift somewhere, which calmed my mind somewhat. I still failed (at a damned intersection of course), but I felt I did much better this time.

The fifth and final test day dawned and I had not driven at all for a week or so, I was at the point of looking for reasons to give up on the whole show. I decided that morning not to care whether I passed or not. I  drove into town, drove around the streets a bit (with total disregard for anyone) and went for my test. I walked in and greeted my tester (the same woman as last time) with a friendly smile and off we went. During the test we chatted about dogs, living out of town and our favorite gardens, I was at ease and it felt as if I was just giving a friend a lift again. To my complete surprise I managed to complete the course without hitting anyone or making any huge mistakes.


The relief at passing was profound and I am left wondering if I can just stay on my red P plates and not have to sit any more tests (I have no need to go faster than 90km/hr and it's best not to add alcohol to any driving attempt anyway). I am now driving myself to work and have managed to fit in one trip to the dump on my way to work. I still don't enjoy the driving at all, it terrifies me and the level of concentration I have to maintain for an extended time is very draining. However I do enjoy getting home before dark (some days I can make this happen) and being able to do small jobs on the way home. The biggest drawback of driving myself and not having to wait for a lift is in my knitting time.

For years I have managed to get a decent amount of knitting done in the passenger seat of a car, on a bus and at cafes or bus stops. Now my knitting is mostly happening while on playground duty (yes, I can knit without looking) and in the evenings, which is, in turn cutting into my spinning, pottery, weaving and other crafting time.

I did manage to make a cute little yarn bowl as a gift though.


I also made a little gold one to sell.

I took this photo of Mt Lindsay on the way up to Brisbane to pick up my daughter (yes the car was stopped).
There is still doubt in my mind about whether having a license and driving is worth all the effort and stress it takes to get here, and the inevitable cycle of having a car to get to work and working to support the car. I guess time will tell.

Sunday 28 May 2017

Meet Emu- a new guinea fowl baby

Some of our guinea fowl looking for bugs.
 It's late in the season for baby anythings, but one of our two (out of ten) female guinea fowls decided a month ago that Autumn is a great time to sit on eggs. Silver (the mum) has been diligently sitting on her nest in the useful scrap pile for some time and my daughter has constructed a fence around her and a roof of sorts over her to protect her from being trampled by sheep or eaten by ducks (not a joke; the ducks ate some of her eggs before we built the fence around her). She has only hatched the one baby and remains sitting on the other eggs. We will have to take them away at the end of the week as we suspect that they are infertile and she won't get off the nest until all the eggs are gone.

Silver on her nest
We keep guinea fowls for tick control around the humpy (see my previous post) and they do a great job; we have not had to take ticks off the sheep or dogs for years. As guinea fowl live for many years we don't tend to hatch many babies (we don't need to replace them often), but sometimes life just finds a way. Our flock at the moment consists of ten birds; eight males of various ages and two females. Silver (the hen that went clucky) is only four years old and her mate is at least ten years old, proving that love doesn't take account of age. We think the age difference may be why only one egg has hatched. She had many different ages of male to choose from; the males range from two years old right up to ten plus years old. Some sources say that guinea fowl have harems (like chooks) but at our place they tend to prefer having a permanent partner who will hang around the nest site being generally unhelpful while the female sits on the eggs and get very excited when she hatches babies.

Patch, Silver's mate
Our new baby; Emu was taken away from his mum as soon as he hatched because guinea fowl are terrible mothers. His dad and the other males came to the humpy door as soon as they heard him squeaking, they hung around for a day or so trying to mount a rescue, but eventually decided to give up and go to the pub. Emu lives in a heated box inside at the moment. He eats insectivore mix, ground grains and live termites (collected daily). He is one happy, contented little keet (guinea fowl chick). Unfortunately, guinea fowls are impossible to truly tame; guinea fowl may have been domesticated before the humble chook (or jungle fowl) but they haven't evolved into the quiet, biddable fowl that chooks have become (for the most part). Little Emu startles at any movement and shadows on the wall frighten him into a darting, cheeping mass of nerves, he's just a very highly strung bird. My daughter has high hopes of turning him into a sweet, cuddly pet though.


Emu eating termites


Emu under his heat lamp
In other news...
Primrose the Rainbow lorrikeet has been up to her usual tricks and I managed to get a few shots to share.
Prim playing with a pencil

A blurry Prim in a tree on a walk to the front gate.

Wednesday 17 May 2017

Washing machine garden beds update


The beds are actually growing vegetables.
I don't want to crow too loud but the washing machine beds seem to have escaped the notice of ducks, possums and chooks alike. I very carefully don't check on the progress of the little seedlings growing in them while I can see anyone in the yard as all the various life forms seem to take notice of what we humans think is interesting and investigate themselves.
The process for watering or checking is ridiculously clandestine; first I go out the door on the opposite side of the humpy and mess around in the yard for a few seconds, once everybody gets the news that I'm out there and the paparazzi starts to gather I casually drop a handful of grain on the ground and retreat from the ensuing feeding frenzy back inside.

The paparazzi gathering

Then I very quietly go out the back door and water, check, feed or whatever I need to do with the beds, all the while keeping my eyes open for visitors. If I see a duck or chook come back around the side of the house I just pretend to be admiring the scenery until they leave.
Why not just lock up the ducks and chooks I hear you ask? Well... the ducks are muscovies and are quite territorial so they chase the possums out of the yard, they patrol all night and all day. They contribute to the safety of the garden without even knowing it. The two chooks left running wild in the yard are delicate in nature (Big; our old rooster is too aged to be in the general population any more and Curly is a special case who just doesn't fit in anywhere else). Also, I sort of enjoy the challenge and the sneaking around.


This is Curly; our special needs chook.

The snow peas, carrots, silverbeet and beetroot in these beds are all doing really well so far, I'm hoping for a full harvest this year.

Carrots and peas

Silverbeet

Peas, beetroot and lettuce

Peas and beetroot

Lettuce

Peas and beetroot

Lettuce
I will write a post about our special needs chook; Curly soon. This chook is an interesting case...even for us.

Monday 8 May 2017

Making a yarn bowl

What is a yarn bowl? I hear you ask. Well..it's a decorative piece of knitting or crochet equipment whose sole purpose is to stop the yarn ball from running away under the lounge while you work and getting covered in dust bunnies (and who knows what else in my house).


 Yarn bowls can be made of anything really; wood, clay, plastic, felt, or any number of other materials. The important thing is that they hold the ball securely inside and have a yarn guide that keeps the yarn from getting really tangled as you pull it through.


I pulled these photos of yarn bowls straight from an internet search. Some of them are so pretty.

 While not strictly required for knitting or crochet, they do add a touch of class to the whole thing. I love the look of them and can imagine a row of yarn bowls on a shelf, each with it's own little ball or cake of yarn sitting patiently in it while I decide what I will knit today, or sitting on a table beside my chair as I effortlessly and smoothly knit Fair Isle patterns without tangles, snarls or swearing.


The ones with lids have the advantage of being more dust proof I suppose, but there is something about seeing your yarn while you work that is so soothing and satisfying.


Home made yarn bowls here we come...

I decided to use what I had in my craft supplies (not really a choice when getting extra materials means driving two hours), I had air dry clay left over from previous projects and it is relatively cheap to buy. Next I needed a template for my bowl (not owning a potting wheel or even knowing how to use one). I found two bowls that might do among my stash.

Air dry clay from my stash

A mat, a bowl, a rolling pin, coffee and a water bottle...I'm set

Oh, and a knife for shaping


Cut a chunk off the clay and mush it up until it's soft.

Cover my chosen bowl with cling wrap

Roll the clay out flat with the rolling pin and mold it over the bowl.

Cut the spiral shape into the clay (carefully) and be sure to leave a gap wide enough for yarn to pass through

Sand the rough edges off the bowl once it's dry, especially the spiral bit


Another possible mold


I decided to try molding inside this one

Before sanding the bowl down, you can see how rough the spiral is

Using my new yarn bowls


While I don't actually need them to knit, or even to keep my yarn from getting tangled, the little yarn bowls are fun and decorative. I think I will make some more to sell at the markets and on Etsy. Maybe I can add paint to them, or use different coloured clay to make them.