I wrote an e-book!
Linda Woodrow has just released an e-book with recipes for healthy muesli bars. If you ever have to fill a lunchbox, for anyone, this is the book for you.
Sunday, 19 January 2014
Saturday, 18 January 2014
Making pasta sauce
The tomatoes in the Hugelkultur bed have been supplying us with yummy Roma tomatoes for some time now and we have added them to most lunches and dinners (and the occasional breakfast), we are all at the 'I don't like tomatoes any more' stage, reached at some point in every harvest season when there is a glut. Therefore, I decided (this morning) to make some pasta sauce and bottle it using my trusty but under utilized Fowlers Vacola (FV) unit. That way we can have our tomatoes to eat in the winter when we are all craving them. I decided to use glass jars with metal lids (the ones you buy pasta sauce in in the supermarket) instead of the traditional FV jars because the FV jars I own are all huge (1 litre is the smallest) and we use our pasta sauce in small lots so the smaller jars are more practical for us.
 |
| A bucket of Roma tomatoes from the garden |
 |
| Stage one of the Hugelkultur beds cleared and waiting for a compost top up and mulch before replanting. |
I found a fairly easy recipe for tomato pasta sauce that can be preserved using the water bath method. The recipe below has been copied from the Brisbane Local Food site and changed only slightly. The link in the title will take you to the original post.
Home made pasta sauce
Makes 1.5 cups
You need a large non stick frying pan or a wok and a stick blender
1/3 cup of extra virgin olive oil
1 onion, finely chopped
1 fresh bay leaf
500g ripe tomatoes, roughly chopped
2 cloves of garlic, finely chopped
8 sprigs of basil, oregano or mint
sea salt, ground black pepper. About 2/3 tsp of salt per 1 1/2 cups of sauce is recommended.
Heat oil to medium heat, add onion and bay leaf, cover and cook for 5 minutes or until onion is softened but hardly coloured. Add tomatoes, garlic and herbs. Cover, cook on medium heat, stirring frequently until tomatoes have collapsed. Add seasonings and blend until the sauce is a pleasing consistency and you are ready to bottle.
Preserving
Put sauce into clean, sterilised jars with good lids that will vacuum seal. If the pulp is still really hot, put a sterilised spoon in the jar before filling to prevent cracking. Place jars in a water bath up to their necks and bring the temperature up to 93.3 degrees Celsius (or 200 degrees Fahrenheit).
Hold at this temperature for two hours. Remove from the preserving pan and press down the lids to encourage vacuum sealing.
N.B. The Fowlers Vacola manual states that unless you use all their gear they won't be held responsible for these instructions being no good.
 |
| The chopping begins |
 |
| But not before they get a good wash |
 |
| Pasta bottles; found, de-labeled and washed by my eldest daughter (thanks hon) |
 |
| The sauce; boiled, seasoned and blended, ready to bottle. |
 |
| My good old FV stove top unit. Isn't she a beauty? |
 |
| The bottles in their bath, all carefully positioned so they don't touch each other or the sides. Fowlers Vacola frowns on touching in the bath. |
 |
| The final result; six yummy bottles of pasta sauce. I had better label them before I forget what they are though. |
Sunday, 12 January 2014
Making calendula ointment

When I cleared the trailer bed for square foot garden planting, I harvested my calendula flowers. Calendula in the vegetable beds helps to reduce insect attacks (and looks very pretty). The buttery yellow petals were stripped from the flower heads, packed into a glass jar and covered with sunflower oil. This very pretty jar was placed on and eastern facing window sill (well, on a shelf below the window) and shaken occasionally. At this stage it looked like a natural themed lava lamp. After four weeks the infusion was ready to use.
I made three 100ml pots of calendula ointment for my friends and family. Calendula ointment can be used to treat cuts and grazes, hives, eczema and skin rashes. The recipe I use is simple (in the extreme) and easy to make;
Calendula Ointment
35g natural beeswax
1 1/2 cups calendula infusion (sunflower oil based)
1 ml Benzoin tincture.
Melt beeswax and calendula infusion in a small double saucepan, do not exceed 50 degrees C. Remove from heat and add benzoin tincture. Pour into dark glass jars while hot and leave to cool.
 |
| Clean jars ready to be filled. |
 |
| The ointment on the stove. I know I said double saucepan, but I couldn't find mine so I used a small copper bottomed pot on a really low setting. |
 |
| Beeswax being weighed. |
 |
| Pouring the warm ointment into a jug makes it much easier to pour into little jars. |
 |
| See........ |
 |
| Now I screw the cap on and wait for them to cool and solidify. |
Have a go at making your own herbal ointments; they are effective and safe as well as a lot of fun to make.
Monday, 30 December 2013
A floor made from old tyres
My eldest daughter is home from university, having finished her degree. She will be living at home until she graduates (July), meaning that we now need more room. When she left for uni three years ago I erroneously assumed that meant she had left home so I converted her bedroom into a craft/storage room. Having failed to comprehend the vast array of time off uni students have; I then had to relegate her to the fold out lounge for semester breaks, study weeks and holidays. Now she is home for a six month stretch and in need of a space of her own. It was decided to build a floor on the inside dirt patch that we always planned to cement (but didn't) and move the lounge area there so she could have a room with a window next to her sister.
Having looked around for the cheapest option we decided on 'yellow tongue' flooring over a suspended frame of some kind. Some research revealed that foundations and piers are often made from old tyres, so it was off to the massive pile of old tyres left at the front of our property by a previous owner. We have been using these tyres for many purposes over the years and we hope to clear the pile by 2020 or so by making them useful.
After an expensive trip to Bunnings, we were ready to build.....
 |
| The yellow tongue ready to be painted. |
 |
| We painted one side with a water proofing paint containing tar. |
 |
| The second coat made them much darker. |
 |
| The site of the future lounge room. |
 |
| We leveled off the floor and began to lay tyres out. |
 |
| The old dog looked on; confused, as we built. |
 |
| We found a place in the creek where gravel washes into a basin and collected a trailer full. |
 |
| The tyres were filled with gravelly soil mixed with cement and left to set. |
 |
| Black plastic was laid down and the yellow tongue screwed down. |

 |
| This turned out to be a bit too bouncy for a lounge room floor; so the panels were taken off and we all stood scratching our heads and looking for a solution for a while. |
 |
| Eventually we got some 4' X 1' timber from my parents scrap pile (sorry 'might be useful one day' pile) and screwed it down to form a base for the panels. |
 |
| Everyone had a go at the drill. |
 |
| The panels were then screwed down over the black plastic liner (painted side down). |

 |
| The floor was then painted with floor oil (which includes a varnish) |
 |
| And the holes where filled with spak filler. |
We now have a new lounge room floor and will be lining the ceiling and putting up wiring for lights tomorrow. My daughter has room for a bedroom of her own and we have used thirty three tyres from the pile. It looks great and feels good to walk on too. I am thinking of renaming our house 'the rubbish house' because we use so much rubbish in the building of it.
What do you think of our new floor??
Tuesday, 24 December 2013
Square foot gardening update number two
The trailer bed I planted using the square foot gardening method is growing really well. I am pleased with the results, mostly. Some of the squares are not growing as well as I would like for a variety of reasons, but the bed looks great and I will be starting to pick greens for salads very soon.
 |
| The climbing and bush beans are thriving (as you can see), they are heading up the trellis and some are even growing out the top of the net. |
 |
| The baby salad greens are ready to harvest too; don't they look yummy. |
 |
| The little cucumbers are finally up and starting to grow. The beans are providing competition for light though; I will have to remember to plant the climbers further apart next time. |
 |
| The Ceylon spinach is thriving and is ready to use but the mizuna, onions and carrots have not taken off as I would have liked. The germination rate for the carrots and onion was low too. |
 |
| The eggplant is up and growing well and the Tokyo bekana is ready to eat but the silver beet is struggling and I am down to two in the square. |
 |
| The capsicum is a seedling as none of the seeds I planted germinated, but it is growing really well. |
So far I am impressed with the method, even though I will have to fine tune the planting a bit next time.
My advice to myself so far is;
Plant climbers with at least one square between them to minimize crowding.
Plant advanced seedlings of most vegetables (not carrots or beans).
Plant extra carrot seed, at least three per hole, to allow for poor germination.
Plant fast growers like beans two weeks after other seeds to reduce over shading of seedlings.
Elsewhere in the garden........
 |
| My marigolds are looking beautiful at the moment. |
 |
| I have a big pot of Lemon Balm (Melissa) coming up right beside the door. |
Saturday, 21 December 2013
Happy Litha to all
Yesterday was Summer Solstice in the southern hemisphere (which includes us). The Earth's annual journey around the sun has bought us back to the peak of solar strength and the promise that 'this too shall pass' and winter will come again.
 |
Every year we head to water for our Litha celebration; it pays to have water close when playing with fire.
Litha is a celebration of the sun reaching the height of his strength and a realization that everything is cyclic and even the awesome power of the sun waxes and wanes. We decorate the altar and surrounds with sun symbols and imagery. We perform a ritual to say thank you for the light and heat that let us live on this planet, then we party.
 |
| Decorating the tree behind the altar (facing North) |
 |
 |
| The altar is coming together nicely too |
 |
| I love the twisted branches of this tree. |
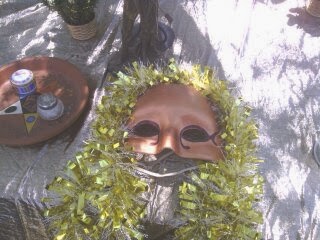 |
| The Sun Lord's mask. |
 |
| My partner wearing his Litha crown. |
 |
| The Sun Lord in a light hearted moment. |
 |
| The mask after the ritual, hanging in the tree, watching over our revels. |
 |
| The Sun Lord casting the flaming spear into the water to symbolize his current strength and the shortening of the days from this point onward as the suns strength wanes towards winter. |

 |
| Feasting from the altar. |
 |
| The spear is floating in there somewhere |
Happy Litha to all. I hope your day was as pleasant as ours.
 |
| A holed rock hanging in the tree. |
Subscribe to:
Posts (Atom)